Clock Grids
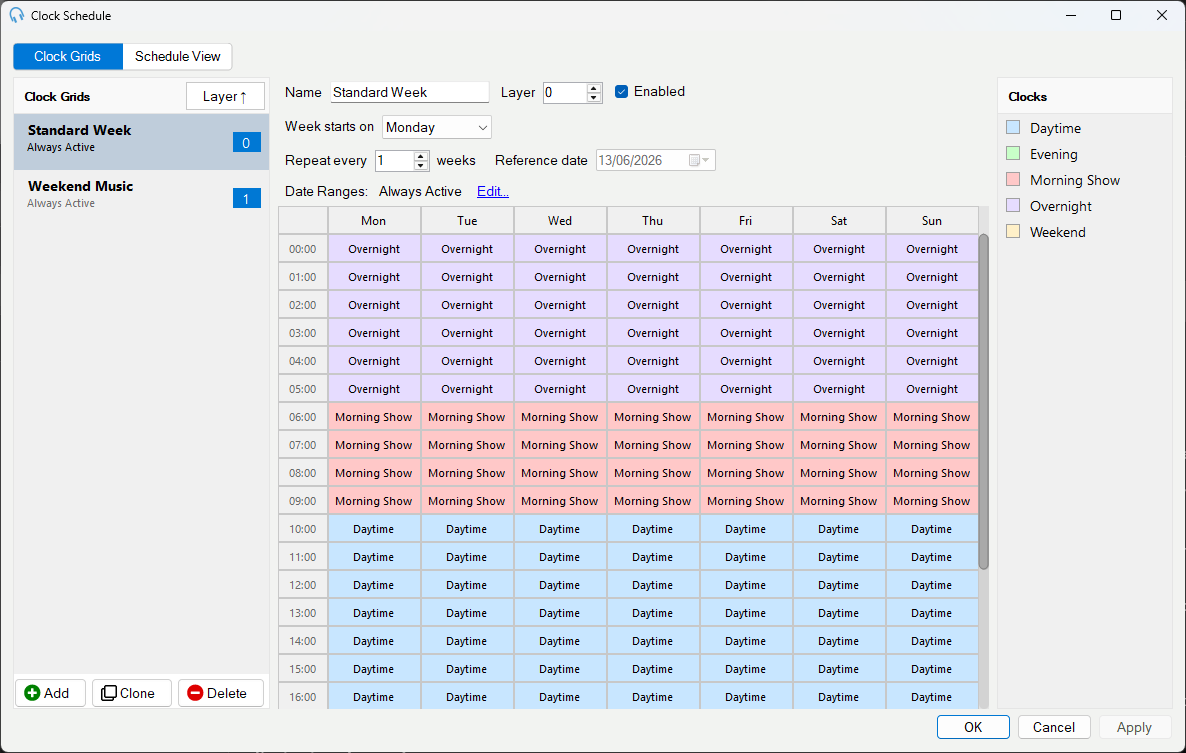
The Clock Grids view is part of the Schedule Clocks window. It is where you build and edit the weekly templates that drive the schedule. Each grid assigns a clock to each hour of the week and can be limited to specific date ranges or week recurrence. Multiple grids are stacked using the Layer value.
Note: Using more than one clock grid requires a licence with the Advanced Scheduling module. A single grid can always be used. If the module is not licensed, only the base (lowest layer) grid takes effect and a banner explains how to enable the rest.
Editing the grid
Each cell of a grid represents one hour of one day of the week. Assign a clock to a cell in any of the following ways:
Drag and drop: drag a clock from the clock list on the right-hand side onto a cell. If you have a range of cells selected, dropping a clock onto the selection applies it to every selected cell at once.
Right-click menu: right-click a cell or selection to open a context menu with the following options:
- Assign 'clock name' - apply the clock currently selected in the clock list to the selected cells.
- Clear - remove the clock assignment from the selected cells, leaving them empty so they fall through to the layer below.
- Copy - copy the selected cells.
- Paste - paste copied cells over the selection.
Copy and paste: select one or more cells, then press Ctrl+C to copy and Ctrl+V to paste. This shortcut also works in the Schedule View.
Layers
Each grid has a Layer number that controls the order in which grids are combined to produce the final schedule. PlayIt Live starts with the clocks from the lowest-numbered layer and then stacks each successive layer on top, with higher-numbered layers overriding the hours set by the layers below.
Clock grids do not need to be fully filled in. Where a higher-layer grid leaves a cell empty, the clock from the layer below still takes effect for that hour. Only the hours you explicitly assign in a higher layer are overridden; everything else falls through to the base.
For example, you might have:
- Layer 0 - Standard Week: a fully filled grid covering every hour of the week with your normal clock rotation.
- Layer 1 - Weekend Music: a grid with clocks assigned only to Saturday and Sunday. Monday to Friday are left empty, so those hours come from Layer 0 as normal.
- Layer 2 - Bank Holiday: a grid with clocks assigned only to the hours of a bank holiday day. All other cells are empty and fall through to whichever layer below them has a clock for that hour.
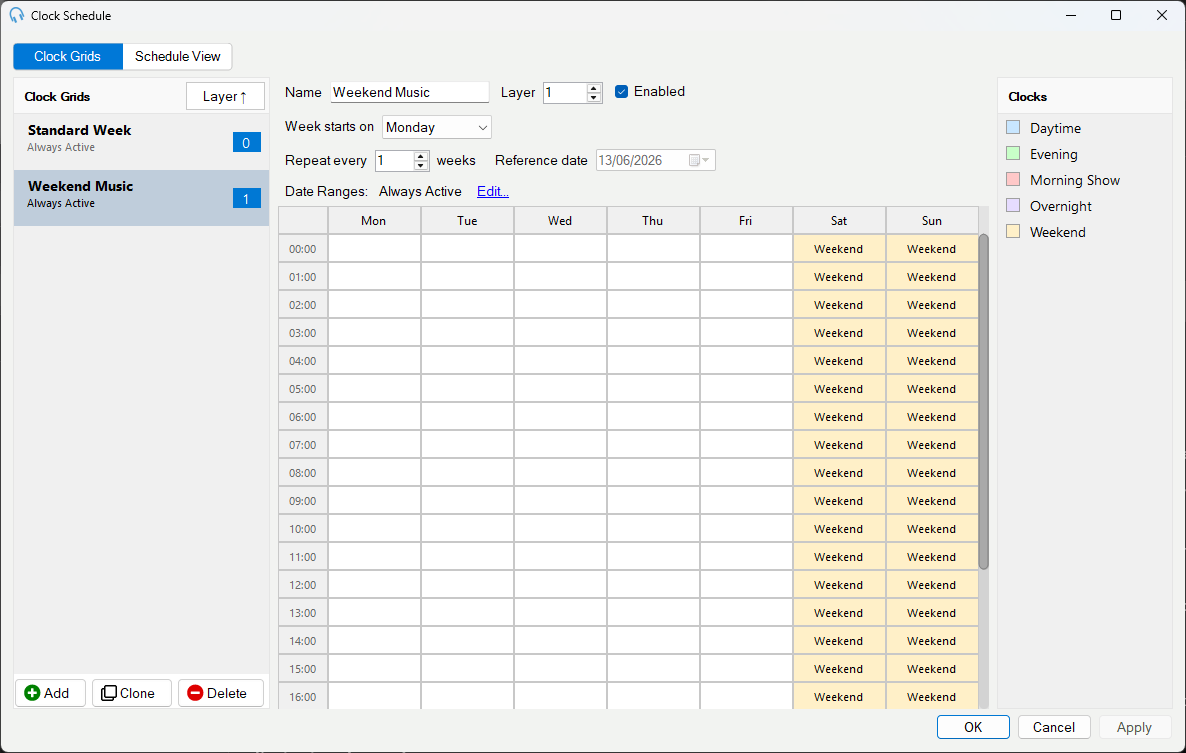
The Weekend Music grid at Layer 1 fills only Saturday and Sunday. The empty weekday cells fall through to the Standard Week grid on Layer 0.
If two grids share the same layer number, the one that comes first alphabetically by name is applied first, and the next one stacks on top of it. For example, if both "Evening Jazz" and "Evening News" are at Layer 1, "Evening Jazz" is applied first and "Evening News" overrides any hours it covers.
Note: When Advanced Scheduling is not licensed, only the base (lowest-numbered) grid stays active so the week keeps full cover. Higher overlays take effect once Advanced Scheduling is enabled.
Recurrence and the reference week
By default a grid applies every week. Use Repeat every N weeks to make a grid apply only on a repeating cycle of weeks.
For example, a station that runs a different schedule on alternate weeks could set up:
- Week A: a grid set to repeat every 2 weeks, with its reference week set to any week where Week A should play.
- Week B: a second grid also set to repeat every 2 weeks, with its reference week set to the following week.
Both grids sit at Layer 0 and cover the full week, so on any given week exactly one of them is active. Because this requires two grids, a licence with the Advanced Scheduling module is needed.
The reference week is the anchor PlayIt Live uses to count the cycle. Weeks are counted in whole steps from the reference week, and the grid is active when the count from the reference is an exact multiple of the interval. Week starts on sets which day each week begins on, so the cycle lines up correctly with your schedule.
Recurrence combines with layers and date ranges: an every-other-week grid can sit at Layer 1 and only override the hours it needs to change, leaving the weekly base at Layer 0 to fill in everything else.
Date ranges
A grid with no date ranges is active all the time. Add one or more date ranges to restrict a grid to only the periods you specify. Outside those ranges the grid is ignored and the layers below take over as normal.
Use date ranges when a grid should only apply for a known period of time rather than running indefinitely. Common examples:
- Seasonal programming: a Christmas schedule grid with a date range of 23 December to 2 January. Outside that range the standard week beneath it plays as normal.
- One-off events: a bank holiday grid active only on that day, leaving every other day unaffected.
- Temporary changes: a grid covering a promotional period or a sports season, automatically switching off when the period ends without having to remember to disable it manually.
A grid can have more than one date range, so you can reuse the same grid for recurring fixed dates without duplicating it. Date ranges also combine with recurrence: a grid set to repeat every other week and limited to a date range will only apply on the active weeks within that range.
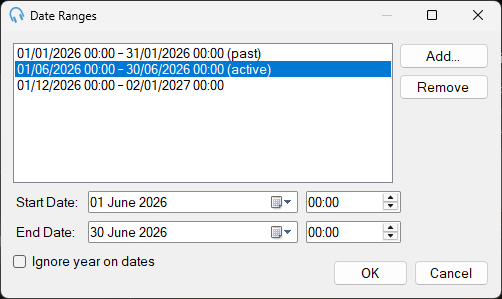
Ignore year on dates: when you add or edit a date range you can tick Ignore year on dates to make it repeat every year. The year you enter is ignored and only the day and month are matched, so the range switches on automatically each year between the same dates. A Christmas grid with a range of 23 December to 2 January and this option ticked will apply every festive season without you having to update the dates, including the wrap across the new year. Recurring ranges are listed by day and month only, with a (recurring) badge, and never show a (past) suffix because they apply every year.
Click Edit Date Ranges... in the grid properties to open the Date Ranges window.