Edit Track Window
The Edit Track window allows you to view and edit the properties of a track in your library. Open it by selecting a track in the Manage Tracks window and clicking Edit, or by double-clicking a track.
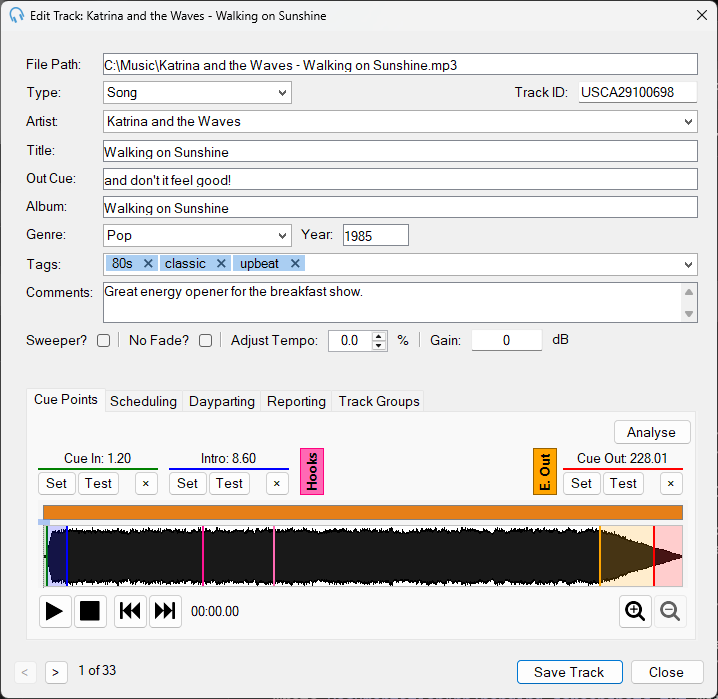
The Edit Track window showing track properties and cue points.
File Path

The full file path of the track's audio file on disk. This field is read-only. Click the folder button to the right of the path to open the folder containing the audio file in Windows Explorer, with the file selected. If the file no longer exists on disk, a message is shown telling you that it could not be found.
Type

The track type, which can be Song, Station ID, Promo, Commercial, News, Bed, or Station ID + Bed. When set to Inferred, the type is determined automatically from the track's tags, artist, title, and duration. See Inferred Type rules for details.
Artist

The performer of the track. This is typically read from the file's metadata tags when the track is first imported. You can type a new value or select from previously used artists. The Artist field is used by Artist Separation playout policies to ensure that tracks by the same artist are not played too close together.
Title

The title of the track, typically read from the file's metadata tags when imported. The Title field is used by Title Separation playout policies to ensure that tracks with the same title are not played too close together.
Out Cue

The Out Cue can be the style of the track's ending, such as "Fade Out" or "Sustain"; or the last spoken words in the track, so the presenters know when to talk over the end of the track. This is displayed on the playout log when clicking an item.
Album

The album the track belongs to. This is typically read from the file's metadata tags when imported.
Genre

The genre of the track. Select from the dropdown or type a custom value. This is typically read from the file's metadata tags when imported.
Year
The release year of the track as a four-digit year. This is typically read from the file's metadata tags when imported.
Tags

Semicolon-separated tags for categorizing the track. Tags can be used for filtering and for Inferred Type rules. Select from existing tags or type new ones.
Comments

Free-text notes about the track, such as usage instructions or background information.
Sweeper

When enabled, this allows the playout system to play this track over the intro of the next song (before the Intro point); or over the end of the previous song (after the Early Out point). It is typically used for sweepers, which are short clips that identify the station or show, and are usually dry (no background music) so they do not clash with the track they are playing over.
No Fade

Prevents the track from being faded out when the next track begins. Use this for tracks that have a natural ending that should not be cut short.
Adjust Tempo

Adjusts the playback speed of the track. Tempo can be adjusted from -10% to +10%, without changing the pitch.
Gain

Adjusts the playback volume of the track in decibels. Use positive values to boost quieter tracks or negative values to reduce louder ones.
Track ID

A unique identifier for the track, used for integration with external systems such as music scheduling software or playout logging.
Tabs

The tab bar provides access to additional track settings. See the Tabs section below for details on each tab.
Track Navigation
Use the < and > buttons to navigate between tracks without closing the window. The current position and total track count are shown alongside.
Save Track
Click Save Track to save your changes and close the window. If you are navigating between tracks using the navigation buttons, changes are saved automatically when you move to another track.
Close

Click Close to close the window without saving any unsaved changes.
Tabs
Cue Points
The Cue Points tab is the default view and contains the waveform visualization along with controls for setting Cue In, Intro, Hook, Early Out, and Cue Out points for the track. Cue points are used to control how tracks are played and how they transition to the next track in Live Assist mode. You can use the playback controls to preview the track and fine-tune the cue points.
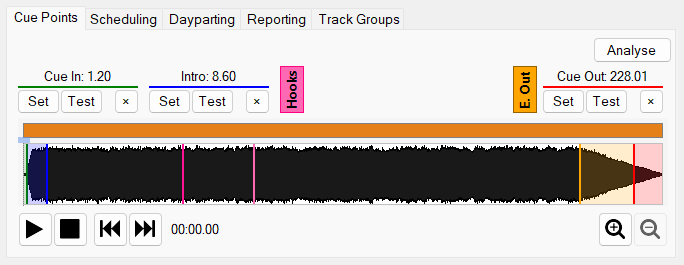
The Cue Points tab with waveform, cue point controls, and analyze button.
Cue Point Controls

The cue point controls let you set the following points for the track:
- Cue In: The position in seconds where the track should be started by a player.
- Intro: The position in seconds where the vocals start on the track.
- Hook Start: The position where a hook in a hook sequence will start. Click the Hooks section to expand this cue point.
- Hook End: The position where a hook in a hook sequence will end, if the full hook is used. Click the Hooks section to expand this cue point.
- Early Out: The position where the track is considered to be almost finished. Click the E. Out section to expand this cue point. Early Out can be used in two scenarios:
- For songs, the point indicates to PlayIt Live that it can place a sweeper after this point as the track is finishing, providing a smoother transition.
- For tracks marked as Sweeper, the point indicates that PlayIt Live can start the next track after this point, allowing the end of the sweeper to play over the intro of the next song.
- Cue Out: The position in seconds where the track is considered to have finished. When this point is reached in Live Assist mode, the players will begin fading out this track and start playing the next track. The players count down the remaining time to this point.
Each cue point has its own Set, Test, and × buttons:
- Set: While listening to the track, click Set to capture the current playback position as the cue point value.
- Test: Click Test to play the track from the cue point position.
- ×: Click to reset the cue point to its default position.
Cue points can also be adjusted using the keyboard or mouse. Click on the cue point value of interest, then use the following:
| Action | Result |
|---|---|
| Left Arrow / Right Arrow | Adjust the cue point by 0.01 seconds. |
| Shift+Left Arrow / Shift+Right Arrow | Adjust the cue point by 0.1 seconds. |
| Click and drag over the cue point value | Adjust the cue point with the mouse. |
| Enter or double-click the cue point value | Test playback from the cue point. |
| Spacebar | Stop playback. |
Analyze Button

Click Analyze to automatically detect the Cue In and Cue Out points based on the silence at the start and end of the track. The sensitivity of the analysis can be configured from Silence Analysis in Settings. The system will not automatically set the Intro, Hook, or Early Out points.
Waveform

The waveform shows the volume of the audio track over time. Cue point markers are overlaid as colored lines using the following color coding:
| Cue point | Color |
|---|---|
| Cue In | Green |
| Intro | Blue |
| Hook | Hot pink |
| Early Out | Orange |
| Cue Out | Red |
Double-click on the waveform to start playing at a different position in the track. Use the Play and Stop buttons to control playback, and the Go to start and Go to end buttons to jump to the start or end of the track. Use the Zoom buttons to zoom in and out of the waveform if you need to set a more precise cue point. You can also zoom with the mouse wheel while hovering over the waveform.
Scheduling
The Scheduling tab contains options for controlling when the track is available for scheduling.
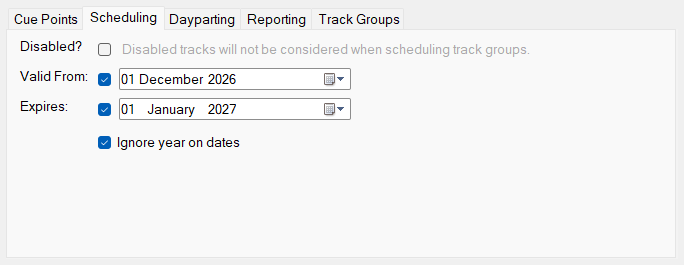
The Scheduling tab with disable, valid from, expires, and ignore year on dates options.
Disabled

Check this checkbox to prevent the track from being considered when scheduling. Disabled tracks remain in your library but will not be scheduled automatically.
Valid From

Check the checkbox and select a date to make the track available for scheduling only from that date onward. Before midnight (00:00) on the selected date, the track will not be scheduled.
Expires

Check the checkbox and select a date after which the track should no longer be scheduled. After midnight (00:00) on the selected date, the track will not be scheduled automatically.
Ignore year on dates

Check this checkbox to ignore the year part of the Valid From and Expires dates so the track recurs every year between the same day and month. For example, a Christmas track set to be valid from December 1 and to expire on January 1 returns to the schedule each year automatically, without you having to update the dates. This option is only available while both Valid From and Expires are checked, and is cleared automatically if you uncheck either of them.
Dayparting
Dayparting requires the Advanced Scheduling premium module.
The Dayparting tab allows you to restrict the track to specific days and hours. This feature requires the Advanced Scheduling premium module. A green indicator next to the tab shows that the module is licensed. If the indicator is red, click it to purchase or start a trial of the module.
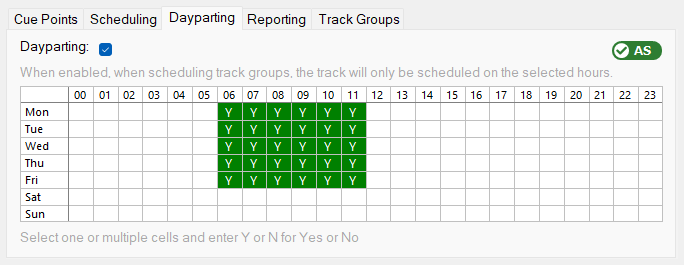
The Dayparting tab with the hour and day selector grid.
Dayparting Enabled
Check this checkbox to enable dayparting for the track. When enabled, the track will only be scheduled during the time slots selected in the grid below.
Dayparting Grid
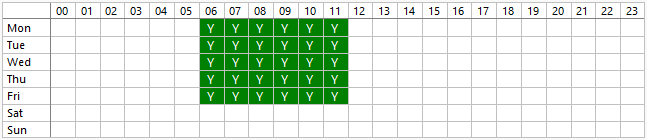
The grid shows days of the week as rows and hours of the day as columns. Select cells and press Y to allow scheduling during those time slots, or N to block them. Green cells indicate allowed time slots.
Reporting
The Reporting tab contains fields used for music reporting and royalty tracking. These values can be exported via Manage > Logged Tracks to report to licensing and royalty collection agencies.
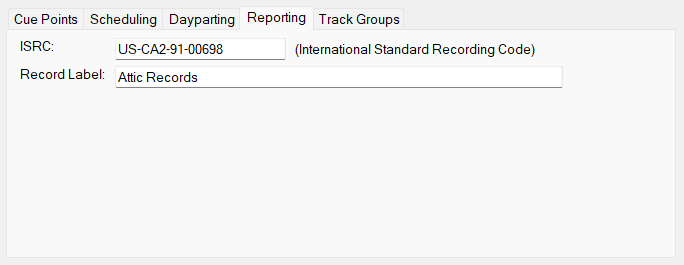
The Reporting tab with ISRC and Record Label fields.
ISRC

The International Standard Recording Code for the track. This is a 12-character code used to identify individual recordings for royalty tracking and music reporting.
Record Label

The record label that released the track. This information is included in music reports.
Track Groups
The Track Groups tab shows which track groups the track belongs to. Track groups are used to organize your library and control scheduling rotation. Alongside the Listed Track Groups that you can add and remove, the tab also displays any Filtered or Grouped Track Groups that dynamically include this track. These dynamic memberships are read-only and shown for reference.
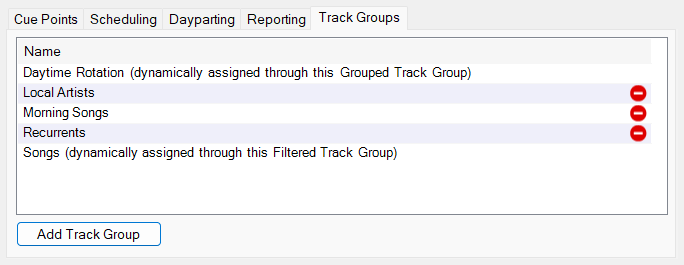
The Track Groups tab showing group memberships.
Track Group List
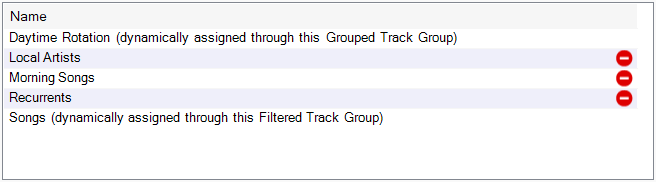
The list of Listed Track Groups that the track currently belongs to. You can select a group and press Delete to remove the track from it. Filtered and Grouped Track Groups that dynamically include this track are shown alongside for reference and cannot be edited from this tab.
Add Track Group
Click Add Track Group to add the track to an additional Listed Track Group. A dialog will appear allowing you to select from available track groups.