Live-Assist Mode
Live-Assist Mode is the primary operating mode in PlayIt Live. It provides a comprehensive interface for managing live broadcast playout, with players at the top, a playout log showing upcoming and past items, a track list for browsing and adding tracks, and controls for automation and scheduling.
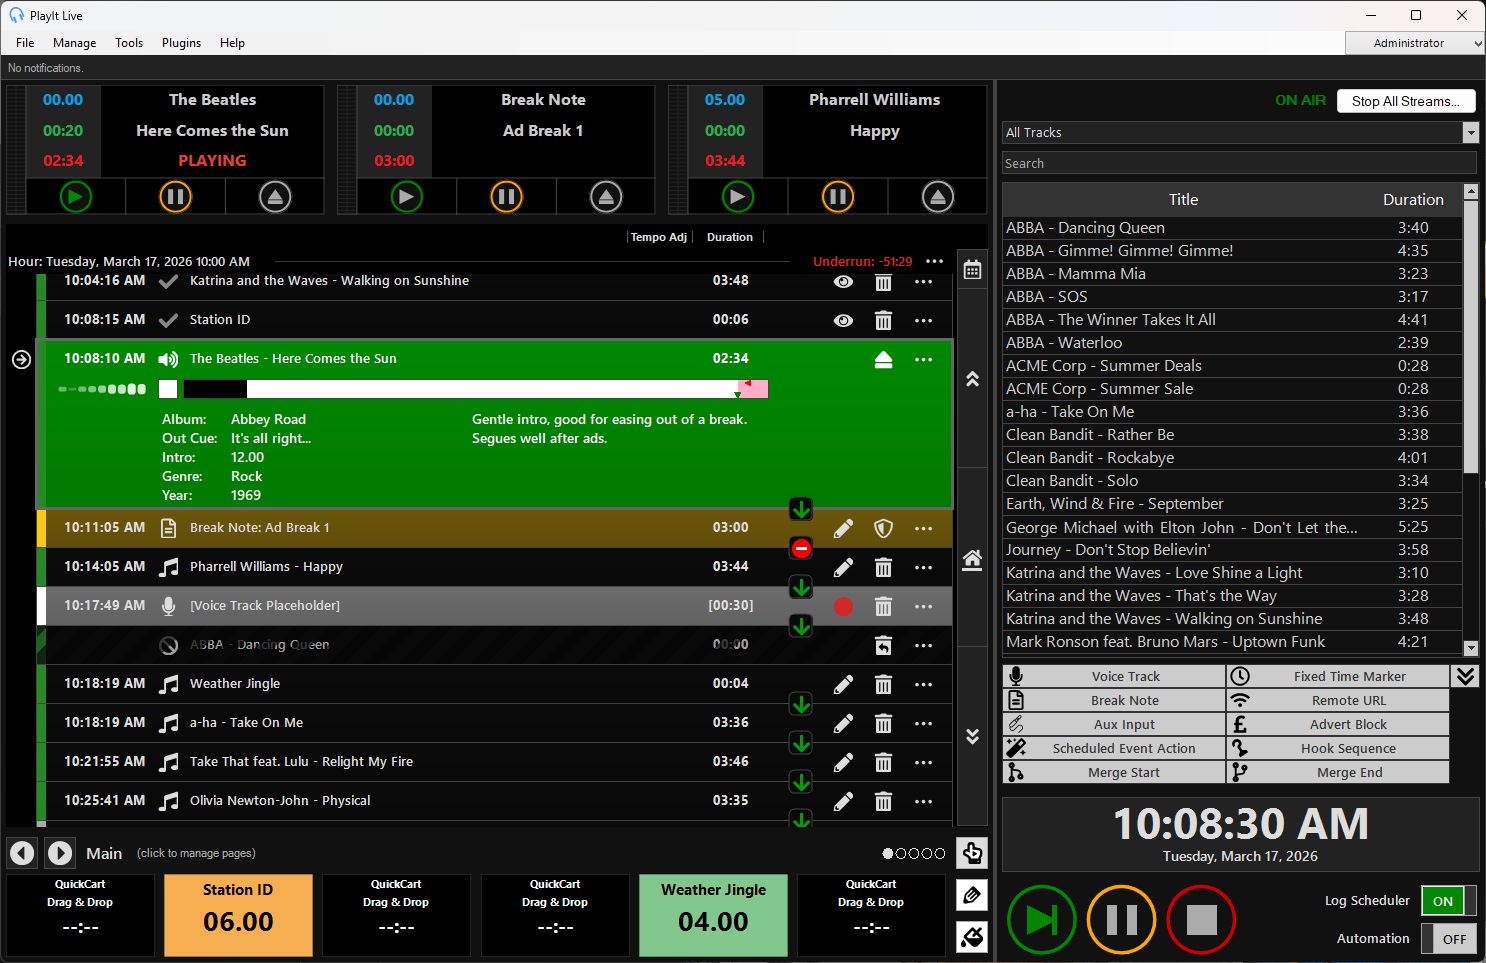
Menu

The top menu bar provides options to set up PlayIt Live.
The File menu contains:
- Enable remote connections: Set up PlayIt Live to enable the built-in remote management server and allow remote connections for managing data and remote voice tracking.
- Sync with a remote server: Set up PlayIt Live to connect to a remote management server such as PlayIt Manager or the built-in server in another PlayIt Live.
- Settings: Configure the user interface and audio devices.
- Exit: Close PlayIt Live. A confirmation box will be shown.
The Manage menu contains:
- Tracks: Manage track audio items.
- Track Groups: Manage track groups (like smart folders) containing tracks.
- Logged Tracks: View recently played tracks for reporting purposes.
- Playout Policies: Manage rules to create a unified sound.
- Playout Pattern: Manage the pattern of track groups that will be used for playout.
- Clocks: Manage clocks used to generate the playout log.
- Clock Schedule: Manage clock hourly assignments used to generate the playout log.
- Playout Log: Manage the overall, day-to-day output of your station.
- Advert Campaigns: Manage advert campaigns for playing adverts (commercial spots).
- Advert Log: Manage the advert log, the log of adverts and when they will play.
- Advert Play Report: Export a report of when adverts were played for affidavits.
- Scheduled Events: Manage events that can be triggered to happen at a specific time or when PlayIt Live starts.
- Priority Streams: Manage priority streams which can be used to override normal live-assist automation and bring in a live presenter/DJ via a remote stream.
- Users: Manage users who can log in to use the software.
The Tools menu contains:
- Missing Track File Analysis: Find and resolve tracks that reference files that have been moved or deleted.
- Duplicate Track File Analysis: Find and delete track files that have been added to PlayIt Live multiple times.
- Track Play Count Analysis: Determine the number of plays tracks have had during a date/time range.
- Database Clean-up: Clean up the database, deleting old playout log items and voice tracks.
- Mixdown Playout Log: Mixdown a portion of the playout log to MP3 or WAV for later broadcast or review.
- Monitored Folder Status: View the status of your monitored folders and force a re-scan if necessary.
- Loudness Analysis: Analyze the tracks in the database so each track has the same loudness.
- Backup and Restore: Manually or automatically back up the database periodically. You can also restore the database to a previous backup.
- Auto Adjust: Automatically adjust segues and tempos of tracks in Live-Assist Mode.
- Internet Broadcast: Set up internet broadcast streams to stream your audio output to an internet streaming provider.
- Now Playing: Set up now playing metadata targets to send your current playing track information to a file or remote service.
The Plugins menu contains:
- Plugin Manager: View the list of currently installed plugins and create new ones.
- [Number of running plugins]: Shows the number of plugins that are currently running.
The Help menu contains:
- Online Documentation: A link to the documentation page on the PlayIt Software website.
- New to PlayIt Live? video: A video showing how to use the basic features of PlayIt Live.
- Open Application Data Folder: Opens the PlayIt Live application data folder. Only perform this step if requested by PlayIt Software Support.
- Open Sound Control Panel: Opens the Windows Sound Control Panel. Allows you to see and configure any attached audio devices.
- License Information: View your currently applied license information and allow you to update your license.
- Spec Check: Verify if your computer meets the minimum or recommended specifications to run PlayIt Live.
- About PlayIt Live: View the latest version and check for updates.
Notification bar

The notification bar is used to provide important information to the user without disrupting their current activity. Warnings will be displayed here if there are any setup issues or a track fails to load.
Players

The players at the top load tracks from the playout log in the expected order. Players can be assigned to individual sound cards so they can be used with different channels on a professional mixer.
Each player has three timers and three buttons.
The blue timer indicates the intro remaining of the loaded track. The green timer indicates the elapsed time of the loaded track. The red timer indicates the remaining time of the loaded track.
The green play button starts playing the track. The orange pause button pauses the track. The silver eject button fades out and stops the player.
Playout log
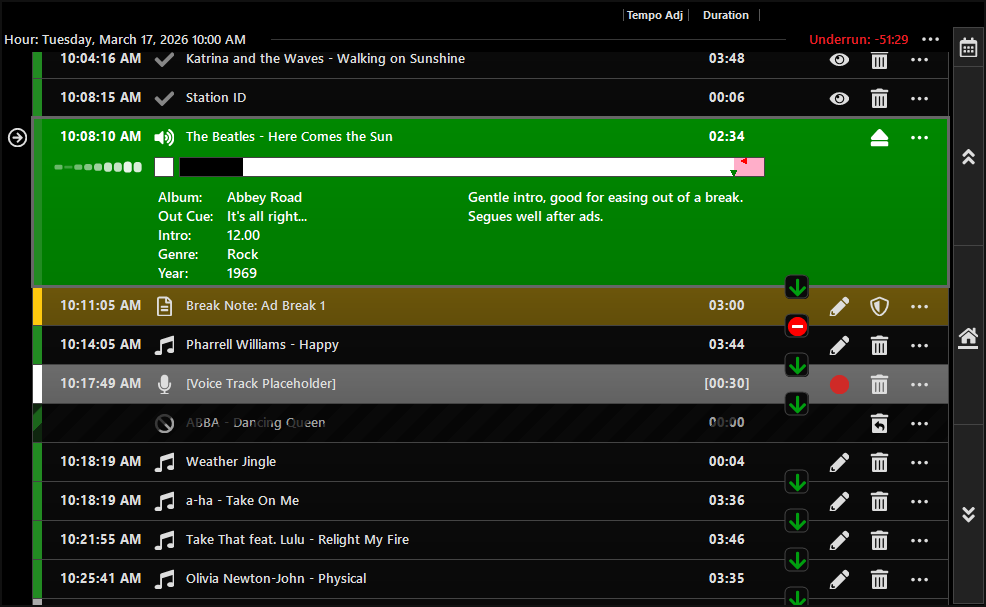
The playout log shows the upcoming items that are scheduled to take place. Typically these are tracks to be played, but can be break notes, fixed time markers, or other special items. Each playout log item features (from left to right) the play time  , icon, title, tempo (if adjusted), duration (or remaining time)
  , segue toggle switch, edit and eject/delete button. These are the default columns; you can change which columns are shown by right-clicking the column headings and selecting Select Columns (see Displaying more information about a track below). A three-dots ellipsis icon is used to show additional menu options.
Icons
The icon on the log item displays the type of the item. Icons and colors can also be customized based on the track group a track belongs in. It is possible to color the entire row by changing this setting.
 - Track
 - Voice Track
 - Break Note
 - Fixed Time Marker
 - Currently playing item
 - Past item that was played
 - Past item that was not played
 - Future item that will not be played due to a fixed time marker
Current Item
The current item is indicated by a right arrow in a circle icon:

The current item is the currently playing or the next item to be played when playout resumes.
Adding tracks
To add a track to the playout log, drag and drop a track from the Track List to a position between existing tracks or between an empty "drag tracks here" marker. If you dragged a track into a position soon to be played it will be loaded into one of the players in sequence. You can also drag and drop audio files directly from Windows File Explorer into the playout log.
Playing tracks
To play the track, click the Play button in the player at the top. When an item is playing it will be shown in green and the duration column will display the remaining time for that item.
While a track is playing, the progress bar will be displayed showing the current position in the track. To change the position, click the Seek checkbox to the left of the progress bar and then click the position in the progress bar. The Seek checkbox is there to prevent the position of the track from being accidentally changed while on air.
The triangles on the progress bar indicate the track's trigger points: the gray down-pointing triangle marks the fade point (Cue Out), and the red triangle marks the point at which the track is ejected and finishes.

Navigating the playout log
It is possible to scroll up to past items to see what was played, or scroll down to see what is going to be played in the future. You can do this by scrolling with the mouse wheel or using the up and down arrows to the right of the playout log. You can also navigate using the keyboard arrow keys or the Page Up and Page Down keys.

You can click the Home button to return to the current item. Pressing the Home key on your keyboard does the same. The Home button has two states, underlined and not-underlined. When the Home button is underlined the playout log will automatically scroll with the current item. If you manually scroll away, the Home button will no longer be underlined. After 5 minutes of inactivity the playout log will return home.

The Go to time button can be used to navigate to a specific date and time in the log. This is useful if you wish to edit the log or record voice tracks for a future program.

Toggling segues
A segue is the transitioning of one item into another item. The segue toggle switch changes between a green arrow  and a red stop sign
  . A green arrow indicates that the succeeding track will automatically play after this track. A red stop sign indicates that playout will stop after this track has finished.
Fine tuning segues
The Edit button  allows you to fine tune the segue between the current, preceding and succeeding tracks. This will launch the Segue Editor.
Recording voice tracks
For voice track items the edit button will be replaced by the Record button  . This will launch the Segue Editor allowing you to record your voice track. Until a voice track is recorded, a voice track item will display a placeholder entry. This will not be loaded into a player and will be skipped if a voice track has not been recorded. You can change the length of the placeholder duration by clicking on the duration. By default this looks like [00:30].
Deleting, restoring and ejecting items
- Click the Bin/Trash button
 to soft delete a playout item from the log.
 - Hold the CTRL key to display the Delete button
 to hard delete the item.
 - Click the Restore button
 to restore a previously soft deleted item.
 - If the item is currently playing, the Eject button
 is shown instead. Clicking it fades out the item, and the next item plays if the segue option is set to continue.
Protected items
If the item is marked as Protected, the Shield icon  is shown. This prevents the item from being accidentally deleted. Protected items will not be dropped by Fixed Time Markers or soft deleted by the Auto Adjust feature.
Playout log item menu
Click the Ellipsis button  to expand the context menu for the playout log item. Here it is possible to perform additional actions such as Edit Segue, Edit Track, Delete, Track Play History, or visit Web Links. Right-clicking a playout log item will also bring up the same menu.
Hour headings
The log contains headings for the hour for which the item is scheduled. Each hour shows how much the hour is currently over or under running. Each hour also features an Ellipsis button with additional options. This can be used to schedule the hour now, import an hour from a playout log format, export an hour to PlayIt Playout Log format or a plain text format, or clear the hour completely. The import/export features are useful if you want to save a playlist and import this into another hour. You can also select to Mixdown this hour to an MP3 or WAV file for later broadcast or review.
Scheduling an hour now
Click the hour heading's Ellipsis button and select Schedule Hour Now to immediately populate that hour of the playout log from its scheduled clock, without waiting for the log scheduler to reach it. In the menu, Schedule Hour Now appears at the top, above the existing Import, Export, Clear and Mixdown options.
Schedule Hour Now generates the playout log items for that hour from the clock assigned to it in your clock schedule, exactly as the log scheduler would when it reaches that hour. If you have advanced scheduling, any adverts due in that hour are scheduled at the same time.
This is useful when an upcoming hour has not been automatically populated yet. For example, the log scheduler only looks a short way ahead, so a future hour you have scrolled to may still be empty. Rather than switching the Log Scheduler on (which would schedule from the current point forward), you can schedule just that one hour on demand so you can review, edit, or voice track it ahead of time.
Displaying more information about a track
You can display more information about a playout log item by right-clicking the column headings and selecting more columns. You can resize the columns by clicking and dragging between the columns. You can reorder the columns by going to Select Columns and using the Up and Down buttons.
You can also display more information about a particular track by clicking and expanding the log item. The Out Cue, Intro, Album, Genre and Year are displayed on the left with the Comment field displayed on the right. If the track was recently played, the Last Played time is also displayed.

Frequency spectrum
The playing items on the playout log can display a frequency spectrum visualizing how the audio changes dynamically. The bars indicate the distribution of audio frequencies, from low on the left (bass) to high on the right (treble). This can be disabled under Settings.

Navigating with the keyboard
- Up: Move the selection one item up.
- Down: Move the selection one item down.
- Page Up: Move the selection one page up.
- Page Down: Move the selection one page down.
- Home: Move the selection to the current item.
QuickCarts panel

The QuickCarts panel provides instant playback buttons for jingles, sound effects, and other audio items. See QuickCarts.
Internet broadcast indicator

The status of your internet broadcast. To enable internet broadcasting, set up a stream from Tools > Internet Broadcast (see Internet Broadcast).
Currently logged in user

This shows the user who is currently logged in. To log out, click the button and then click Log out. This is only shown when Require users to log in to use PlayIt Live is checked on Manage > Users.
Track Group selector

To filter the track list by track group, select the track group from the dropdown. The track list will show only tracks that exist in the selected track group. Track groups can be managed from Manage > Track Groups.
Track search box

Use the search box to filter the track list. When text is entered, the track list shows only tracks whose displayed column values contain that text (by default this is the Artist - Title). Click the clear button to remove the filter.
The search box also supports advanced expressions that filter on a specific field. For example, enter ActiveDuration < 180 to show only tracks shorter than 3 minutes (180 seconds).
Searching only filters within the track group currently selected in the Track Group selector.
Track list
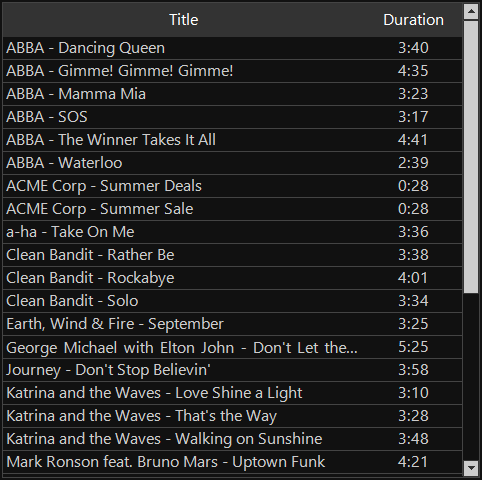
The track list shows a list of tracks added to the system. By default, the list shows each track in the form Artist - Title with the duration in the second column. Click either column to sort by that column, click the column again to reverse the sort order. The list can be filtered using the search box or the Track Group selector above.
It is possible to select the columns in this list by right-clicking a column and selecting Select Columns. On the track list, it is also possible to right-click a track item to view additional options such as Edit Track, Pre-Fade Listen, Track Play History, and Web Links.
The track list can be resized by dragging the space to the left of the track list.
Special items
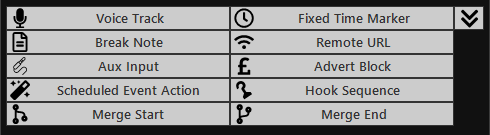
While Tracks are a fundamental playout log item type, you can also insert special items into the log. Simply drag and drop the box for the item type you want to insert into the playout log. You can click the down arrow icon to collapse this section to save space.
Onscreen Clock

The onscreen clock shows the current date and time. The onscreen clock can also be configured to include two additional clocks, for example, countdown clocks. Right-click the clock and select Configure.
Clock types that can be selected are:
- Current Time: Shows the current clock time.
- Until End of Hour: Shows a countdown until the end of the current hour.
- Until Time in Hour: Shows a countdown to a specific time within an hour. This can be useful if your show ends a few minutes before the top of the hour to account for commercials/advertisements.
- Until Next Fixed Time Marker: Shows a countdown to the start of the next fixed time marker. This can be useful to count down to the next break.
- Until Next Stop: Shows a countdown to the next time audio will stop playing. Note that the playout engine only looks forward up to 5 hours, so it will display --:-- if audio will stop in the long-term future.
Log Scheduler Switch

Switch the log scheduler ON to automatically schedule the playout log so that there are always items scheduled to play out.
Automation Switch

Switch automation ON to automatically schedule the playout log and lock it so it cannot be changed to prevent accidental changes. Switching Automation ON will also switch on the Log Scheduler.
When Automation is switched on, a message will be shown at the top of the playout log indicating that the log is locked.
Master controls


The master controls control the overall player status. Click the Play button to start the next item in the playout log. When the audio is playing the Play button will become a Play Next button which, when clicked, will advance to the next track. Click the Pause button to pause all playing players. Click the Stop button to fade out and stop all playing players.
Priority Streams
When one or more priority streams are open, priority stream players are displayed below the main live-assist players. These will indicate which priority streams are connected and playing.
When priority streams have overridden main live-assist playout, a message will be shown to indicate this.
For more information see the Priority Streams section.