Bulk Editing Tracks
Bulk editing lets you change a property on many tracks in a single operation, instead of opening and saving each track one at a time. It is useful whenever a group of tracks needs the same change, such as correcting a misspelled artist name across a whole album, setting the Genre on a batch of newly uploaded songs, or marking a set of dated promos as Disabled.
You select the tracks you want on the track list, open the bulk edit page, tick only the fields you want to change, enter the new values, and save. Changes are written back to PlayIt Manager and synchronised to any connected PlayIt Live installations, just like a normal edit.
Selecting tracks
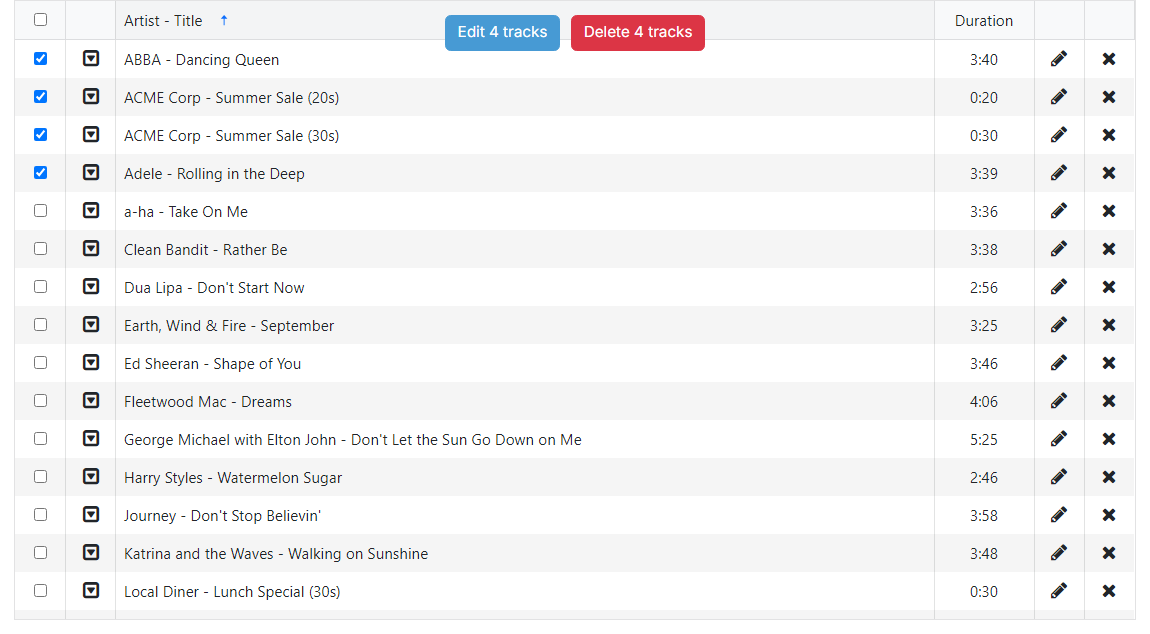
Each row in the track list has a checkbox on the left. Tick the rows you want to edit, or use the checkbox in the column header to select every track currently shown. Use the search box and track group filter first to narrow the list down to the tracks you care about before selecting.
When one or more tracks are selected, a button bar appears with an Edit button (showing how many tracks are selected) and a Delete button. Click Edit to continue. If you have only a single track selected, this opens the normal Edit Track page; with two or more selected it opens the bulk edit page described below.
Row checkboxes

The left-hand column shows a checkbox on each row; four rows are ticked.
Select-all checkbox

The header checkbox at the top of that column selects or clears every row currently shown.
Selection bar

With tracks selected, a selection bar appears over the grid header containing a blue Edit 4 tracks button and a red Delete 4 tracks button.
The bulk edit page
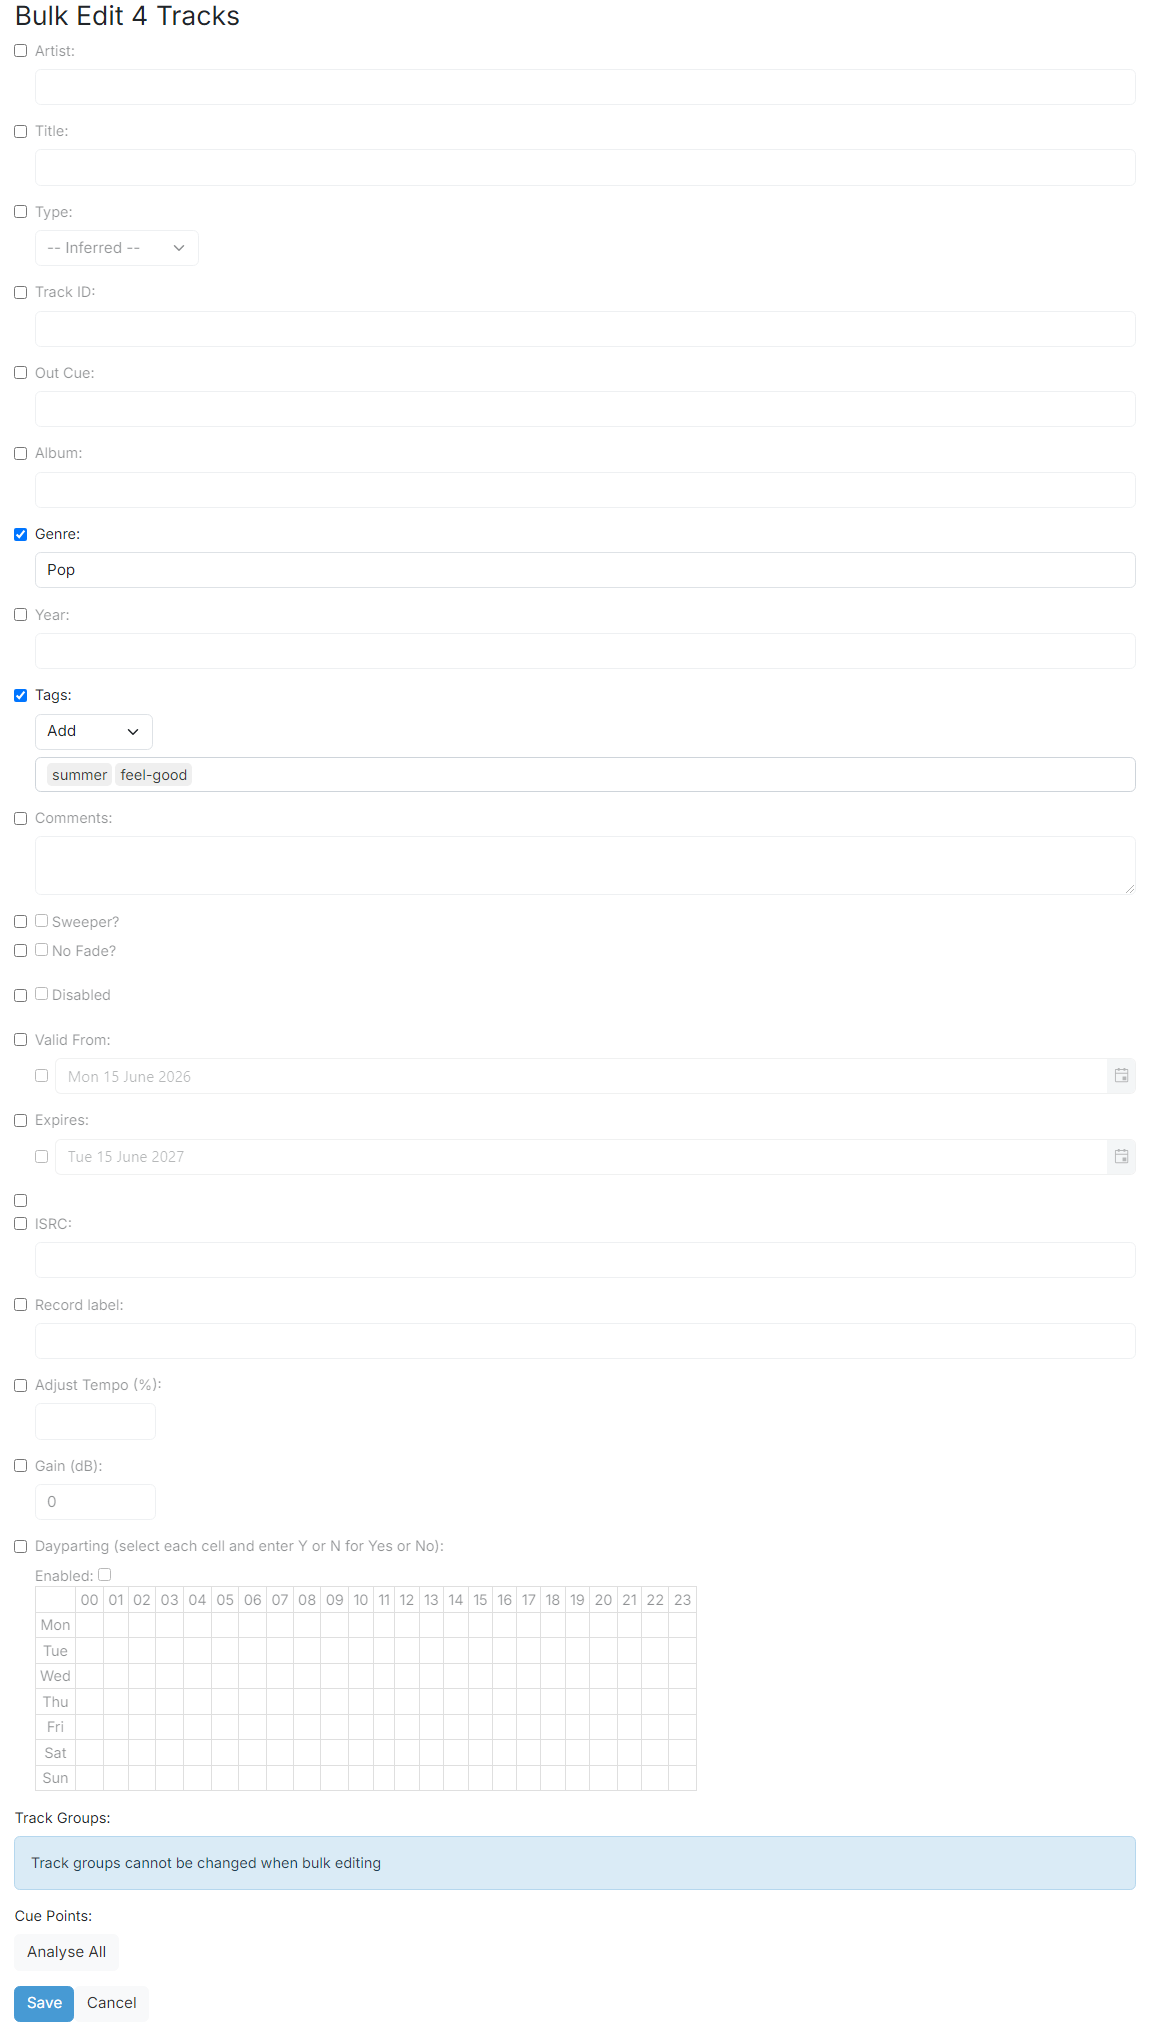
The bulk edit page looks like the Edit Track page but with a checkbox beside every field and a heading reading Bulk Edit 4 Tracks. Each field is pre-filled with the value shared by all the selected tracks; where the selected tracks have different values the field is left blank.
Tick the checkbox next to a field to include it in the update, then set the value you want. Only ticked fields are applied. Every field left unticked is untouched on all the selected tracks, so the change is precise and you never overwrite values you didn't mean to. Click Save to apply the changes to all the selected tracks, or Cancel to discard them and return to the track list.
The following fields can be set in bulk: Artist, Title, Type, Track ID, Out Cue, Album, Genre, Year, Tags, Comments, the Sweeper?, No Fade? and Disabled flags, Valid From, Expires, Ignore year on dates, ISRC, Record label, Adjust Tempo (%) and Gain (dB). Track groups cannot be changed here, and cue points are handled by the Analyse All action rather than by entering values (see below).
Page heading

At the top is the heading Bulk Edit 4 Tracks, showing how many tracks the changes will be applied to.
Ticked field

This example shows the Genre field with its checkbox ticked. The field is set to "Pop", so the genre is changed across every selected track. Every other field works the same way: tick its checkbox to include it in the update, or leave it unticked to keep it untouched.
Unticked field

This example shows the Album field with its checkbox unticked, so it will be unchanged on all the selected tracks. Fields whose selected tracks shared a common value are pre-filled with that value; fields whose values differ are left blank.
Save and Cancel

The Save and Cancel buttons appear at the bottom. Click Save to apply the ticked fields, or Cancel to discard the changes.
Example: setting a genre on a batch of uploads
Suppose you have just uploaded fifty new songs and want them all filed under the Pop genre. On the track list, tick all fifty (filter or search first to isolate them, then use the header checkbox), and click Edit. On the bulk edit page, tick the Genre checkbox, type Pop, and click Save. All fifty tracks are updated in one step and every other property is left exactly as it was.
Editing tags in bulk
The Tags field works a little differently because tracks usually have several tags and you rarely want to discard the ones already set. When you tick Tags, an operation dropdown appears with three choices that control how the tags you enter are combined with each track's existing tags:
- Overwrite: replaces all existing tags on the selected tracks with the tags you enter. Any tags the tracks already had are removed.
- Add: adds the tags you enter to each track without removing any existing tags. Use this to supplement the current tags.
- Remove: removes only the tags you enter from each track, leaving all other tags intact. Use this to clean up tags that are no longer relevant.
Type the tags to apply into the tag box, where each tag appears as a removable label. The tags you enter are then combined with each track's existing tags according to the operation you chose. In the example below, two tags are entered ready to be added to every selected track.

The Tags field with its checkbox ticked, the operation dropdown set to Add, and two tags entered as removable labels ready to be added to every selected track.
Bulk analysing cue points
Cue points can't be typed in across many tracks, but you can detect them automatically for the whole selection. Click Analyse All in the Cue Points section to run cue point detection on every selected track in turn, finding the Cue In and Cue Out from the silence at each end. The detected cue points are applied when you Save. This saves opening and analysing each track individually on the Edit Track page.
The Cue Points section shows an Analyse All button. Click it to detect the Cue In and Cue Out for every selected track in one pass; the detected cue points are written to the tracks when you click Save.
Track groups
Track group membership cannot be changed from the bulk edit page; the Track Groups section shows a note explaining this. To change the track groups of several tracks, edit them individually on the Edit Track page.