Settings
The Settings window allows you to configure all aspects of PlayIt Recorder. Open it from the File menu by clicking Settings....
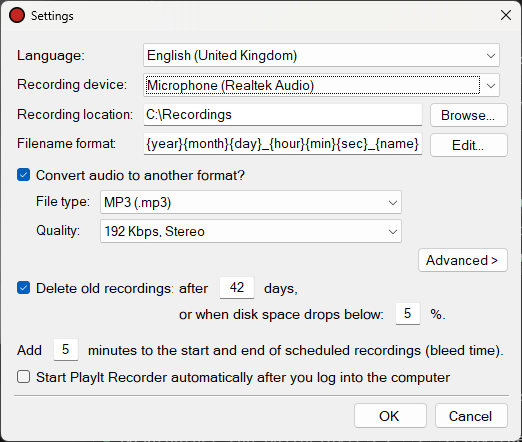
The Settings window with all configuration options.
Language

Select the display language for PlayIt Recorder. Changes take effect after restarting the application.
Recording Device

Select the audio device you wish to record from.
Recording Location

Enter the folder where recorded audio files will be saved. Use the Browse... button to find the folder. You should ensure that the currently logged in user has access to write to this location.
Filename Format

Enter the format for the filename. This is the template that will be used to generate the filename for the recording. Use the Edit... button to show a helper window to help you build the filename format.
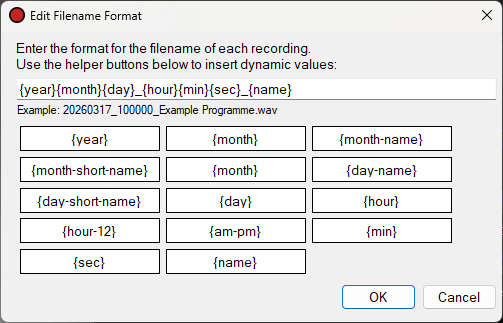
Hover over each of the dynamic value buttons, e.g. {year}, to find out what will be displayed. An example is displayed below the text box to show what will be generated.
It is possible to add a backslash \ to put recordings in folders. For example, {year}{month}{day}\{hour}{min}{sec}_{name} would place recordings in a new folder for each day.
Audio Conversion
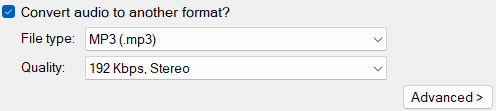
By default audio will be recorded in WAV format.
Recording audio can be converted to another format. In its simplest configuration, you can configure MP3 in various qualities. Higher qualities sound better but take up more disk space. Click the Advanced > button if you wish to use your own encoder and parameters.
Advanced: For full control over the encoding process, click Advanced > to switch to advanced mode.
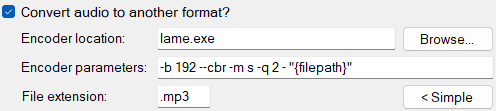
Specify a custom encoder executable and parameters. Enter the path to the encoder in Encoder location or use Browse... to find it. Enter the command-line parameters in Encoder parameters, using {filepath} as a placeholder for the output file path. Set the File extension to match the encoder's output format. Click < Simple to return to simple mode.
Delete Recordings

You can configure recordings to be deleted after a set number of days, or when the disk space drops below a given percentage.
Bleed Time

You can add a specified number of minutes to the start and end of scheduled recordings to ensure there is no break between old recordings stopping and new recordings starting.
Startup

Tick this box to automatically start PlayIt Recorder when you log into the computer.
OK / Cancel

Click OK to save your settings. Click Cancel to discard your changes.