×
Menu
Index
  • Mixdown Audio Window

Mixdown Audio Window

 
Mixdown Audio Window
 
To play your project in another audio player you need to mixdown the audio to an audio file.
 
1

File

1. File
Enter the file name and folder where you wish to mixdown the audio. Use the Browse... button to select a file on the file system.
2

Format options

2. Format options
Select the format of the audio mixdown. Choose from MP3 or WAV format. For MP3 you can choose the bit rate and mono/stereo option. Lower bit rates take up less disk space but have a lower audio quality.
3

Extend/Trim or fade

3. Extend/Trim or fade or
 
Tick this box if you want the mixdown file to match the target duration. If your project is short it will be extended to the target duration with silence. If it is too long it will be shortened and faded at the end to the time specified.
4

Dynamic range compression settings

4. Dynamic range compression settings
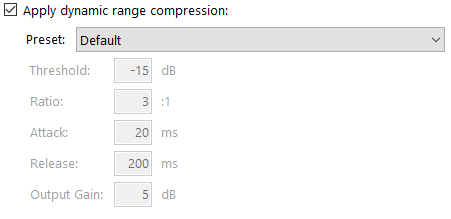
Dynamic range compression, or simply compression, can be applied to the mixdown. This is a process that will attempt to even out the overall volume level of the output by increasing the volume level of the quieter parts of the output and decreasing the volume level of louder parts. There are various presets available that can be used to affect the audio or you can choose custom to enter your own values.
5

Save CUE file

5. Save CUE file
A cue file or cue sheet is a metadata file that describes how the tracks in the mixdown file are positioned. The file can be used by other playout systems, such as PlayIt Live to display and report the currently playing song within the larger audio file.
6

Open file after mixdown

6. Open file after mixdown
Once the mixdown process has finished the audio file will open in your default audio player.
7

OK button

7. OK button
Start the mixdown process. Progress will be shown.
8

Cancel button

8. Cancel button
Close the mixdown window.