# PlayIt VoiceTrack - User Guide
**Version 1.13**
## Contents
**Installation**
- [Installation](#installation-installation)
- [Upgrading Versions](#installation-upgrading-versions)
- [Uninstallation](#installation-uninstallation)
**Getting Started**
- [Getting Started](#getting-started-overview)
- [Logging In](#getting-started-logging-in)
- [Enter Registration Details](#getting-started-enter-registration-details)
- [Verify Email Address](#getting-started-verify-email-address)
- [Activating Offline](#getting-started-activating-offline)
- [Your First Voice Tracked Show](#getting-started-your-first-voice-tracked-show)
- [Remote Voice Tracking](#getting-started-remote-voice-tracking)
**Main Window**
- [Main Window](#main-window-overview)
- [Segue Editor Window](#main-window-segue-editor)
- [Edit Project Window](#main-window-edit-project)
- [Generate Playlist](#main-window-generate-playlist)
- [Playlist Template Builder](#main-window-playlist-template-builder)
- [Mixdown Audio Window](#main-window-mixdown-audio)
**Settings**
- [Settings](#settings-overview)
- [Segue Settings](#settings-segue)
- [Audio Analysis Settings](#settings-audio-analysis)
- [Web Links Settings](#settings-web-links)
**Administration**
- [Administration](#administration-overview)
- [Select Data Source](#administration-select-data-source)
**Tracks**
- [Tracks](#tracks-overview)
- [Manage Tracks Window](#tracks-manage-tracks)
- [Edit Track Window](#tracks-edit-track)
- [Add New Tracks Wizard](#tracks-add-new-tracks-wizard)
- [CSV Track Import](#tracks-csv-track-import)
- [Additional Options Section](#tracks-add-new-tracks-additional-options)
- [Progress Section](#tracks-add-new-tracks-progress)
- [Review Section](#tracks-add-new-tracks-review)
- [Group Section](#tracks-add-new-tracks-group)
**Track Groups**
- [Track Groups](#track-groups-overview)
- [Manage Track Groups Window](#track-groups-manage-track-groups)
- [Choose Track Group Type Window](#track-groups-choose-type)
- [Edit Listed Track Group Window](#track-groups-edit-listed)
- [Edit Filtered Track Group Window](#track-groups-edit-filtered)
- [Edit Grouped Track Group Window](#track-groups-edit-grouped)
**Licence**
- [License Information](#licence-information)
**Loudness Analysis**
- [Loudness Analysis](#loudness-analysis)
**About**
- [About PlayIt VoiceTrack](#about)
---
# Installation
To install PlayIt VoiceTrack, download the latest version from the [PlayIt Software website](https://www.playitsoftware.com/Products/VoiceTrack).
See also: [Upgrading versions](/PlayItVoiceTrack/113/en-US/installation/upgrading-versions) and [Uninstallation](/PlayItVoiceTrack/113/en-US/installation/uninstallation).
## Installation Steps
### Download the installer
Visit [playitsoftware.com/Products/VoiceTrack](https://www.playitsoftware.com/Products/VoiceTrack) and click the **Download** button to download the latest version.


### Run the installer
Once the download is complete, run the downloaded **.exe** file.
### Accept the license agreement
You will first be presented with the software license agreement. Once you have read and agree to these terms, click **I Agree**.
### Choose components
Choose the components to install. Here you can select whether to install Start Menu shortcuts. A desktop shortcut is created by default. Click **Next** to continue.
### Choose install location
Choose the location to install the software. By default, this is in **Program Files**, but can be changed to your preference. Click **Install** to begin installation.
### Launch PlayIt VoiceTrack
Check **Start PlayIt VoiceTrack** and click **Finish** to launch PlayIt VoiceTrack. If PlayIt VoiceTrack does not start, click Start and type **PlayIt VoiceTrack**.
## Minimum Requirements
PlayIt VoiceTrack requires the .NET Framework 4.7.1 which is automatically downloaded and installed via the installer. To install this framework requires at least Windows 10 or Windows 11; or Windows Server 2016 or later, with all Windows updates applied.
---
# Upgrading Versions
New versions of PlayIt VoiceTrack are regularly available from [playitsoftware.com/Products/VoiceTrack](https://www.playitsoftware.com/Products/VoiceTrack). It is important to back up your data before you install any new versions. Data and logs for PlayIt VoiceTrack are stored in the Windows 'ProgramData' folder.
By default, this is located at:
> **C:\\ProgramData\\PlayIt VoiceTrack**
To back up your data, simply copy this folder to an alternative location, such as an external hard drive.
When a new version is installed, or an old version is uninstalled, the data in the location above will not be removed.
---
# Uninstallation
When installed, PlayIt VoiceTrack will include an **Uninstall** shortcut in the Start Menu.
If you chose not to add Start Menu shortcuts, the uninstaller can be found at (by default):
> **C:\\Program Files (x86)\\PlayIt VoiceTrack\\uninstall.exe** or **C:\\Program Files\\PlayIt VoiceTrack\\uninstall.exe**
Double-click the icon to start the uninstall process. Click **Uninstall** to remove PlayIt VoiceTrack.
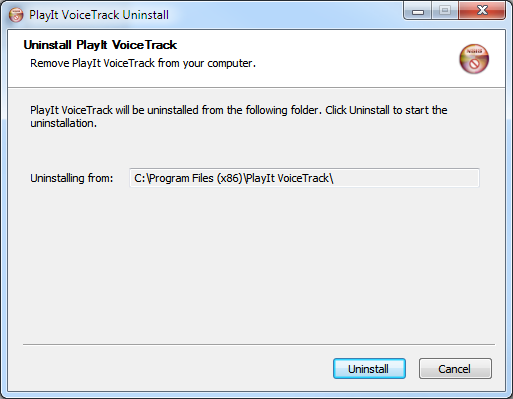
Note that you can choose whether PlayIt VoiceTrack data is removed when you uninstall.
---
# Getting Started
When you first launch PlayIt VoiceTrack, you are presented with the Get Started window.
The Get Started window shown the first time PlayIt VoiceTrack is launched.
In order to begin using PlayIt VoiceTrack, you need to log into your PlayIt Software account. Click the **Log In** button to begin [logging in](/PlayItVoiceTrack/113/getting-started/logging-in). If you do not have an account, you can create one by clicking **Register** or visiting [playitsoftware.com/Account/Register](https://www.playitsoftware.com/Account/Register).
If the computer you are using is not connected to the internet, you can [activate offline](/PlayItVoiceTrack/113/getting-started/activating-offline).
---
# Logging In
To begin using PlayIt VoiceTrack, enter your PlayIt Software account email address and password, or you can log in using your Facebook account.
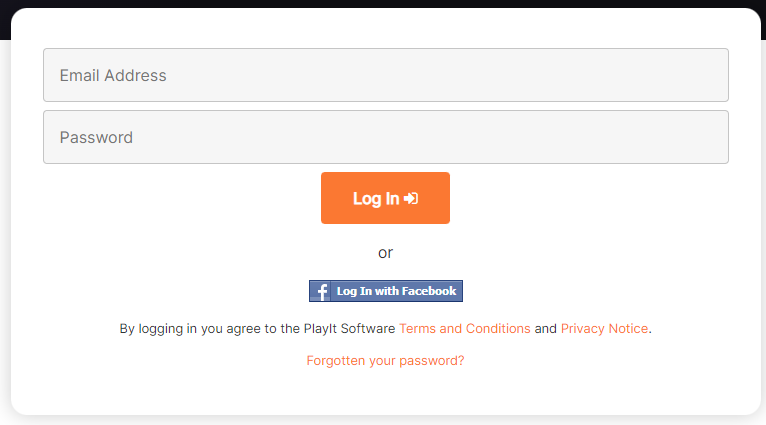
Once you are logged in, the [main window](/PlayItVoiceTrack/113/main-window/overview) will be shown.
---
# Enter Registration Details
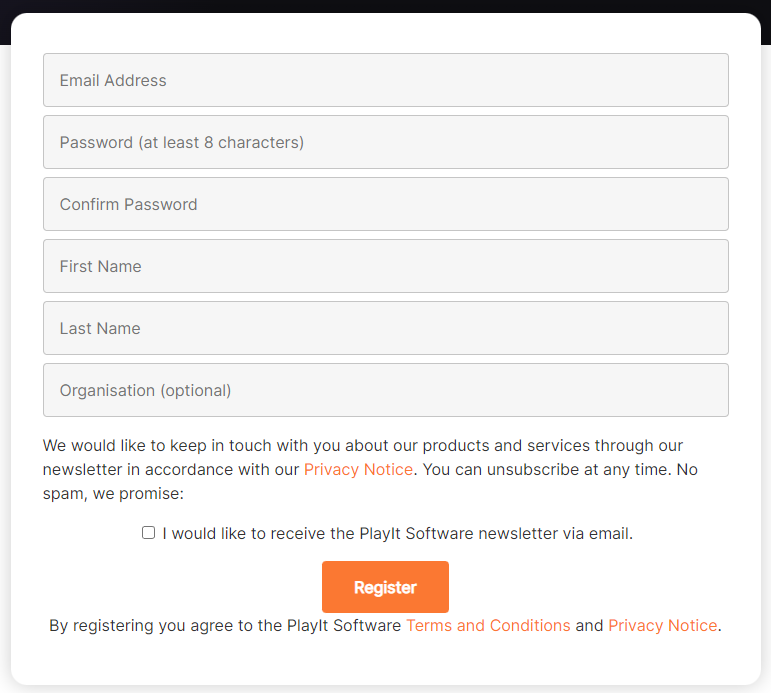
If you do not already have a PlayIt Software account you can register your details here. Enter the required details and click **Register**.
---
# Verify Email Address
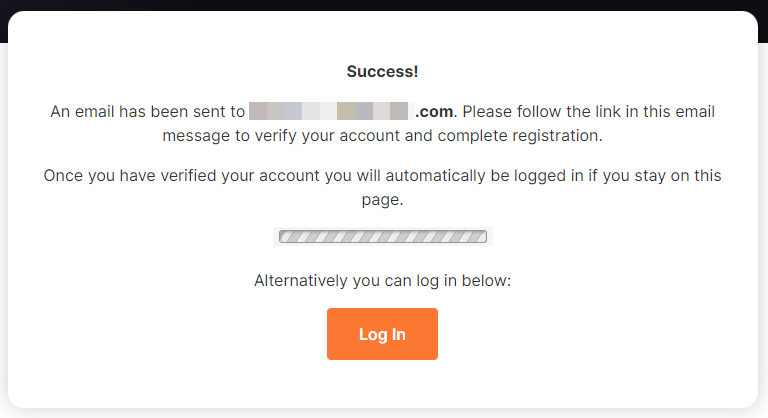
Once you have registered you will need to check your registered email account and follow the link in an email with the subject **"PlayIt Software: Please verify your email address..."**. To ensure you receive this email, please add **[noreply@playitsoftware.com](mailto:noreply@playitsoftware.com)** to your address book. Once you have followed the link you will be logged in and the [main window](/PlayItVoiceTrack/113/main-window/overview) will be shown.
---
# Activating Offline
If the computer on which you have installed PlayIt VoiceTrack is not connected to the internet it is possible to activate offline.
From the **Activation** window, click **Activate Offline...**
Activate PlayIt VoiceTrack offline.
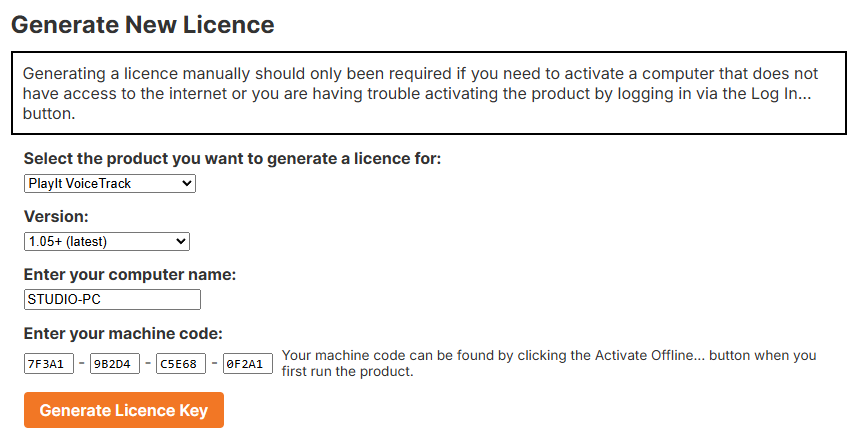
From the Activate Offline window, you can enter your License Key. This is generated from the **Licenses** page in the **My Account** area of the PlayIt Software website. A license can be generated by visiting [playitsoftware.com/Account/Licences/Generate](https://www.playitsoftware.com/Account/Licences/Generate). You may be prompted to log in or create an account. If you have not purchased a license, a demo license will be generated to allow you to evaluate the software.
From the **Generate New License** section, select **PlayIt VoiceTrack** and ensure that **v1.05+** is selected as the version. Enter the **Computer Name** and **Machine Code** you see on PlayIt VoiceTrack and click **Generate License Key**.
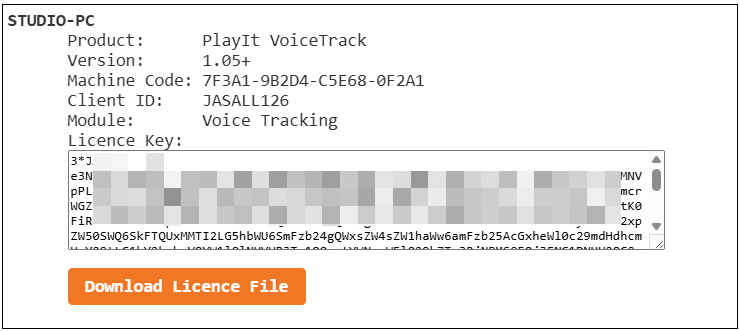
Once generated you will be presented with a license. Copy the **License Key** to the PlayIt VoiceTrack window. Alternatively, download the license file and select the file within PlayIt VoiceTrack. Note that license keys start with the text **3**\*.
---
# Your First Voice Tracked Show
When you first start PlayIt VoiceTrack you are presented with an empty [main window](/PlayItVoiceTrack/113/en-US/main-window/overview), ready for you to build your first show.
PlayIt VoiceTrack on first launch: no project loaded, no tracks in the library, and the demo-mode banner visible.
PlayIt VoiceTrack requires the Voice Tracking module from PlayIt Software. If you have not purchased the module, the software runs in demo mode. Any audio output or mixdown is periodically overlaid with an audio notice and a banner is shown at the top of the main window. Click the link in the banner to purchase a license and remove the notice.
## Adding music
To get started with your first show you need to add some music. Drag and drop audio files from your computer, for example your Music folder:
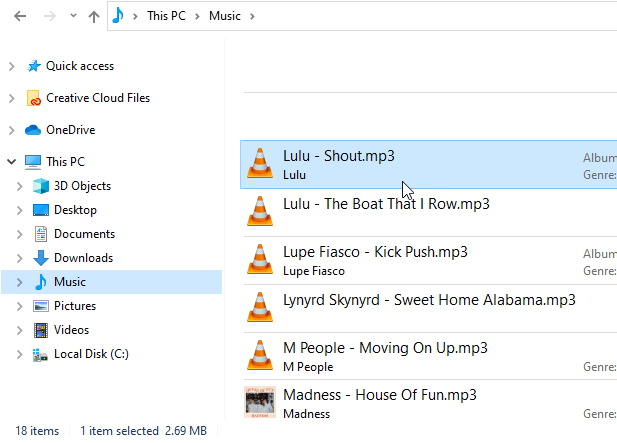
Drag and drop audio files from your computer into PlayIt VoiceTrack.
You can also manage all your music tracks from within PlayIt VoiceTrack from [Manage Tracks](/PlayItVoiceTrack/113/en-US/tracks/manage-tracks). If you have already added tracks to PlayIt Live, [select PlayIt Live as the data source](/PlayItVoiceTrack/113/en-US/administration/select-data-source) to use its library.
Drop the files or tracks into the **Playlist** area. The drop area highlights in green and the cursor shows a copy indicator while you drag over it:
The Playlist drop area highlights green when files are dragged over it.
Continue to add tracks until you have all the music you need. As you add tracks, the **Multi Track View** at the top fills with a waveform representation of each track. The start and end of each track is analyzed for silence to provide a default segue. Use the mouse wheel or the zoom buttons to zoom in, and drag the orange bar to pan through the project.
The Multi Track View visualizes each track and how it segues into the next, with the playlist below listing every track.
When you zoom in, the orange bar at the top of the Multi Track View becomes a draggable pan handle. Drag it left and right to scroll through the project.
Drag the orange pan handle at the top of the Multi Track View to scroll through a zoomed-in project.
## Adding voice tracks
Now that you have songs, it is time to record some voiceover links between them. Click and hold the **Add Voice Track** button on the right side of the main window.
Click and hold the Add Voice Track button to begin the drag-to-insert gesture.
Keep the mouse button held down and drag the pointer into the **Playlist**. A green insertion line appears between the two tracks where the voice track will be inserted. Release the mouse button to drop it in.
The green insertion line shows where the new voice track will land when you release the mouse.
Continue inserting voice tracks between the songs you want to talk between. By default each voice track is inserted with a placeholder duration of one minute, shown in square brackets, for example `[01:00]`. **Click** the placeholder duration to change it to whatever time you want to allow.
The same playlist with blank voice track placeholders inserted between songs, each showing a one-minute placeholder duration ready to record.
To set up recording for a voice track, click the red **record** button on the voice track row in the playlist. This opens the [Segue Editor](/PlayItVoiceTrack/113/en-US/main-window/segue-editor) focused on that voice track.
Click the red record button on a voice track row to open the Segue Editor for that voice track.
The Segue Editor opens on the voice track with an empty waveform, ready to record.
## Selecting your microphone device
The first time you use the segue editor for recording, you should choose the audio device that represents your microphone. Click the **Settings** button in the segue editor and review the audio device selections.
Open the Settings window from the segue editor to assign your microphone.
The Settings window opens on the **General** tab. Under **Audio Device Assignments**, set the **Microphone Recording** device to the input that represents your microphone.
Set the Microphone Recording device to the input that represents your microphone.
The selected microphone device should be one that records only your microphone and does not include any music playback. Click **OK** to confirm any changes.
## Recording the voice track
Click the **Record** button to start recording. Your voice track begins recording and the audio from the end of the preceding track begins playing. Speak into your microphone to record over it.
Click the button again to play the next track in. Click the button a final time to finish recording and stop playback. The button icon changes as you cycle through the states: **Record**, **Play next**, and **Stop**.
**Tip:** Press `R` on the keyboard to cycle through Record → Play next → Stop actions for fast operation.
After recording, the waveform of the voice track is visible and ready for trimming and adjustments.
## Trimming tracks
As the voice track is recorded you will see the waveform being produced. Once stopped, you can trim the start and end of the recording by dragging the start and end of the waveform container.
Drag the start (left edge) of the waveform container to trim the beginning of the recording.
Drag the end (right edge) of the waveform container to trim the trailing silence off the recording.
## Adjusting voice track volume
If the voice track you have recorded is too quiet, raise its level using the **Gain** setting. Click the voice track waveform to select it, then increase the **Gain** value in the **Audio Settings** panel by a few dB. The waveform redraws to show the higher level.
Click the voice track to select it, then increase the Gain by a few dB to raise the level of the recording.
## Changing track segue
You can move any track by dragging the **top bar** of the waveform container. If you move the waveform from the start (i.e. left end) it will be moved in relation to the previous track. If you move the waveform from the end (i.e. right end) it will be moved in relation to the next track. This ensures that track segues remain anchored to their respective tracks unless you explicitly want to change the segue.
Drag the top bar of the waveform to change how the track segues with the previous or next track.
## Fade tracks and changing volume
Once the recording has been completed, you will need to modify the volume of the tracks if you are talking over them. You can do this by clicking on the orange line which represents the volume envelope. This will create an envelope point which you can move to a specific volume at a specific time. Create multiple points to reduce the volume and fade the volume:
1. Select the first point
Click the orange volume envelope line to create and select the first point.
2. Click the line before the point and drag the volume down
Click the line before the first point and drag down to create a second point and lower the music ahead of it.
This will update the waveform so you can visually see the volume is lower before the fade up after the vocal has finished.
## Listening again
Use the playback controls to listen to the output:
Play, pause, skip and seek through your project from the main window.
## Recording a bed (background music) with your voice track recording
When recording a voice track, you will see a **Carts** section on the right hand side. This can be loaded with an audio file, such as a bed for playing under your voice. You can load the audio file by dragging and dropping it from the file system, or you can use the (more options) menu in a cart slot and choose **Load Track…** to load a track from the music database. Click the **Play** button to start playing the cart while recording your voice track. The cart audio will be mixed in with your voice recording. Please ensure you have loaded the cart before starting the voice track recording.
## Recording next voice track
To record the next voice link, click the **Next Voice** button:
Use the Next Voice button to advance through the unrecorded voice tracks.
Repeat the process to record all the voice links.
Click the **Save** button to save changes and exit the segue editor.
Click Save to commit your segue changes and return to the main window.
## Reviewing
The **Multi Track View** at the top will show all the tracks and voice tracks in the project.
Review the whole project in the Multi Track View.
You can double click on any track in the playlist or multi track view to edit the segue or re-record a voice track.
## Saving
You should save your project regularly by clicking the **Save Project...** button or pressing `Ctrl+S`.
Click the Save Project button on the command bar to save your project.
## Project information
The bar at the top displays the information about the project. You can edit the project name and also change the target duration if you need to record to a specific time. The red text shows the under/over time of the target duration.
Project name, target duration and over/under indicator.
## Mixing down to file
Once you are happy with the sound of your show, you can mix the audio down to a single audio file. Click the **Mixdown Audio...** button on the command bar.
Click the Mixdown Audio button on the command bar to open the Mixdown Audio dialog.
The Mixdown Audio dialog combines the whole project into a single audio file.
Choose a file to mix the project down to. Check the **Open file after mixdown** checkbox to open the audio file in your default audio player. Click **OK** to begin mixing down the audio.
Check this to open the mixed-down audio file automatically.
Once the mixdown process has finished you will have completed your first voice-tracked show.
For more about the mixdown options, including format choice, dynamic range compression and cue files, see [Mixdown Audio](/PlayItVoiceTrack/113/en-US/main-window/mixdown-audio).
## Remember: demo mode
If you have not purchased the PlayIt Software Voice Tracking module required for PlayIt VoiceTrack, the mixed-down audio is periodically overlaid with an audio notice. To remove the notice, purchase a license at [https://www.playitsoftware.com/Products/VoiceTrack](https://www.playitsoftware.com/Products/VoiceTrack).
## See also
- [Main Window](/PlayItVoiceTrack/113/en-US/main-window/overview)
- [Segue Editor](/PlayItVoiceTrack/113/en-US/main-window/segue-editor)
- [Edit Project](/PlayItVoiceTrack/113/en-US/main-window/edit-project)
- [Mixdown Audio](/PlayItVoiceTrack/113/en-US/main-window/mixdown-audio)
- [Manage Tracks](/PlayItVoiceTrack/113/en-US/tracks/manage-tracks)
- [Select Data Source](/PlayItVoiceTrack/113/en-US/administration/select-data-source)
- [Remote Voice Tracking](/PlayItVoiceTrack/113/en-US/getting-started/remote-voice-tracking)
---
# Remote Voice Tracking
As a remote voice tracker you can record voice tracks on a remote computer and send them to PlayIt Live or PlayIt Manager. You also edit segues and add additional tracks to the playout log if you wish.
Firstly, to start a remote voice tracking session you will require a Server URL, Username and Password. If you do not have these please request them from your radio station administrator.
## Starting a remote session
To get started, click the **Start Remote Session...** button.
Click Start Remote Session to begin.
Enter the Server, Username and Password and click **Connect**.
Enter the Server, Username and Password and click Connect.
### Server
The URL of the PlayIt Live or PlayIt Manager server hosting the voice tracking session.
### Username
Your username on the server.
### Password
Your password on the server.
### Connect button
Click **Connect** to authenticate against the server and continue to the slot picker.
## Selecting a slot
You will be prompted to select a slot you are allowed to voice track into. Select a slot and click **Select**.
Select a slot and click Select.
### Slot list
The list of shows available to voice track on the server. Select a show and click **Select**, or double-click a row to start.
### Select button
Confirm the selected slot and begin the remote voice tracking session.
### Cancel button
Disconnect and close the window without starting a session.
PlayIt VoiceTrack will download the voice tracking details including the start and end of the audio track files. The start of the track will be up until 10 seconds + Audition Time after the intro point of the track, and the end of the track will be from the last 10 seconds + Audition Time before the cue out point of the track.
## In a remote session
An additional panel will be added to PlayIt VoiceTrack when in a remote session:
The remote session panel showing the update queue and End Remote Session button.
This section shows you the queue of commands that are sent back to the server when making changes. You can also log out by clicking the **End Remote Session** button.
It is important to end the session when you have finished to allow other users to connect if necessary.
PlayIt Live will show the start and end of the tracks with a gap for the voice track placeholder:
The playlist shows the start and end of each track with a gap for the voice track placeholder.
Double-click on the voice track placeholder waveform box to launch the segue editor. You can also click the Record button on the playlist:
Click the Record button on the voice track placeholder row to open the segue editor.
The segue editor works exactly the same as if you were recording a local voice tracked show. You can refer to the [Your First Voice Tracked Show](/PlayItVoiceTrack/113/en-US/getting-started/your-first-voice-tracked-show) section for more detail.
The segue editor works the same in a remote session as it does locally.
Once you have recorded your voice track, click the **Save** button to close the window, or click **Next Voice** to move to the next voice track to record the next one.
When you record the voice track, the voice track is updated in the list and uploaded to the server.
The recorded voice track appears in the playlist and is uploaded to the server.
Your segue changes are also applied. These changes are shown in the **Update Queue** section:
The Update Queue shows changes being sent back to the server.
Your changes are immediately applied to PlayIt Live or PlayIt Manager. There is nothing left to do except to record the rest of your voice tracks. Remember to **End Remote Session** when you have finished.
## Editing the playlist or adding other tracks
You can also drag tracks up and down the playlist to reorder, or you can drag tracks from the track list into the playlist. The track list shown is the track list that exists on the server. When you add a track from the track list, the start and end audio is downloaded from the server.
It is not possible to drop tracks that are on your own computer. You will need to add your own tracks to the server first.
## A note on licensing
Remote voice trackers do not require a Voice Tracking module license in order to voice track remotely. This is required on PlayIt Live in order to broadcast voice tracks.
## Demonstration video
Please refer to this video for a demonstration of remote voice tracking:
## See also
- [Main Window](/PlayItVoiceTrack/113/en-US/main-window/overview)
- [Segue Editor](/PlayItVoiceTrack/113/en-US/main-window/segue-editor)
- [Your First Voice Tracked Show](/PlayItVoiceTrack/113/en-US/getting-started/your-first-voice-tracked-show)
---
# Main Window
The main window is shown when PlayIt VoiceTrack starts.
The PlayIt VoiceTrack main window with a populated project.
### Menu
The menu is used to perform common actions for PlayIt VoiceTrack.
**File:**
- **New Project...:** Start a new project from scratch.
- **Open Project...:** Open an existing project. PlayIt VoiceTrack projects have the extension `*.pivt`.
- **Start Remote Session...:** Start a remote voice tracking session. See [Remote Voice Tracking](/PlayItVoiceTrack/113/en-US/getting-started/remote-voice-tracking).
- **Save Project:** Save the current project for opening later.
- **Save Project As...:** Save the current project under a different file.
- **Edit Project...:** [Edit information](/PlayItVoiceTrack/113/en-US/main-window/edit-project) about the current project.
- **Generate Playlist...:** [Generate a playlist](/PlayItVoiceTrack/113/en-US/main-window/generate-playlist) so you don't have to create one manually.
- **Mixdown Audio...:** [Mixdown](/PlayItVoiceTrack/113/en-US/main-window/mixdown-audio) your project to an audio file.
- **Export Playlist Text File...:** Export the current project playlist to a text file. This can then be used for reporting.
- **Settings...:** [Change the settings](/PlayItVoiceTrack/113/en-US/settings/overview) associated with PlayIt VoiceTrack.
- **Exit:** Close PlayIt VoiceTrack.
**View:**
- **Show Waveforms / Hide Waveforms:** Toggle the visibility of the waveform multi track view. This item reads **Hide Waveforms** when the waveforms are shown, and **Show Waveforms** when they are hidden.
**Manage:**
- **Select Data Source...:** [Select the data source](/PlayItVoiceTrack/113/en-US/administration/select-data-source) for your tracks. Manage tracks directly in PlayIt VoiceTrack or use tracks from PlayIt Live.
- **Tracks...:** [Manage the tracks](/PlayItVoiceTrack/113/en-US/tracks/manage-tracks) available in PlayIt VoiceTrack.
- **Track Groups...:** [Manage track groups](/PlayItVoiceTrack/113/en-US/track-groups/manage-track-groups) used to categorize and filter your tracks.
**Tools:**
- **Loudness Analysis...:** [Analyze the loudness](/PlayItVoiceTrack/113/en-US/loudness-analysis) of the tracks in your library.
**Help:**
- **Online Documentation...:** Open this documentation in your web browser.
- **License Information...:** [View your license information](/PlayItVoiceTrack/113/en-US/licence/information) to update or refresh your license.
- **About PlayIt VoiceTrack...:** Show the [About window](/PlayItVoiceTrack/113/en-US/about) with version information and check for updates.
### Project options
These options are always shown so you can quickly access them:
- **New Project...:** Start a new project from scratch.
- **Open Project...:** Open an existing project. PlayIt VoiceTrack projects have the extension `*.pivt`.
- **Save Project...:** Save the current project for opening later.
- **Start Remote Session...:** Start a remote voice tracking session. See [Remote Voice Tracking](/PlayItVoiceTrack/113/en-US/getting-started/remote-voice-tracking).
### Project information
This section shows information about your project. Here you can see the name of your project and the target duration. The actual duration of the tracks in the project is also calculated, along with how over or under the actual duration is compared to the target duration. Click the **Edit Project...** button to [edit this information](/PlayItVoiceTrack/113/en-US/main-window/edit-project).
### Multi Track View
The multi track view shows waveforms of the tracks and how they are layered in your project. To edit the segue or transition between the tracks, double-click on the track you wish to modify. Use the mouse wheel to zoom in and out of the view. When zoomed in, you can use the mouse to drag the zoom bar to pan through the time in the project.
The gray line indicates the current position marker in the project.
### Playback controls
- **Play** button: start playback from the current playback position.
- **Pause** button: pause playback at the current playback position.
- **Stop** button: stop playback and reset to the previously selected position marker.
- **Move to start**: move the position marker to the start of the project.
- **Move back a track**: move the position marker to the previous track from the current position.
- **Move forward a track**: move the position marker to the next track from the current position.
- **Move to end**: move the position marker to the end of the project.
- **Current playback position**: indicates how long has elapsed in the project.
### Zoom controls
As an alternative to using the mouse wheel to zoom the multi track view, you can use the zoom buttons to zoom in and out.
### Playlist
The playlist shows all the tracks that have been added to the project. From left to right, the columns are:
- **Marker color:** A color indication for the track. By default, tracks are shown in green, and voice tracks in black. This color can be customized by adding tracks to a track group and configuring the track group with a color.
- **Play time:** The time into the project when the track will start.
- **Icon:** Indicates whether the track is music or a voice track. This icon can be customized by adding tracks to a track group and configuring the track group with an icon.
- **Title:** The name of the track.
- **Intro:** The length of the intro in `minutes:seconds`. Displays `-` if the intro point is not set.
- **Duration:** The length of the track in `minutes:seconds`.
- **Record button:** Shown only for voice tracks. Click this button to launch the [segue editor](/PlayItVoiceTrack/113/en-US/main-window/segue-editor) to get ready for recording.
- **Play button:** Plays the track. The current progress is shown in a highlighting circle around the play button.
- **Edit button:** Launches the [segue editor](/PlayItVoiceTrack/113/en-US/main-window/segue-editor) to edit the segue between the previous and next track.
- **Remove button:** Removes the track from the playlist.
Drag and drop tracks from the file system, track list, or a voice track to insert them into the playlist. Hovering over the left margin reveals a handle for reordering, or you can drag anywhere on the row. Moving the mouse between rows lets you insert a voice track between two tracks.
On voice tracks that have yet to be recorded, you can set a placeholder duration and description by clicking the duration in square brackets.
### Mixdown Audio button
When you have created your show project, [mix it down](/PlayItVoiceTrack/113/en-US/main-window/mixdown-audio) to an audio file.
### Generate Playlist
Instead of manually dragging and dropping tracks onto the playlist, you can use the [Generate Playlist](/PlayItVoiceTrack/113/en-US/main-window/generate-playlist) feature to create a playlist for you from a template.
### Add Voice Track button
Use this button to insert a voice track at the end of the playlist. You can also drag and drop the button onto the playlist to insert a voice track anywhere in the playlist.
### Track Group selector
Select a track group from the list to filter the track list to tracks in the track group.
### Track search
Use the search box to filter the track list by artist and title.
### Track list
The track list shows the tracks available in PlayIt VoiceTrack. [Manage the tracks](/PlayItVoiceTrack/113/en-US/tracks/manage-tracks) or [select the data source](/PlayItVoiceTrack/113/en-US/administration/select-data-source) to use tracks from PlayIt Live, then drag tracks to the playlist to add them to the project.
## Demo mode
If you have not purchased the PlayIt Software Voice Tracking module required for PlayIt VoiceTrack, a demo notice will be shown above the main window.
The demo notice that appears when the Voice Tracking module has not been purchased.
To purchase the module, click the link. If you have already purchased the module and this notice is still shown, click **View License Information** to update or refresh your license.
## See also
- [Segue Editor](/PlayItVoiceTrack/113/en-US/main-window/segue-editor)
- [Edit Project](/PlayItVoiceTrack/113/en-US/main-window/edit-project)
- [Mixdown Audio](/PlayItVoiceTrack/113/en-US/main-window/mixdown-audio)
- [Your First Voice Tracked Show](/PlayItVoiceTrack/113/en-US/getting-started/your-first-voice-tracked-show)
- [Remote Voice Tracking](/PlayItVoiceTrack/113/en-US/getting-started/remote-voice-tracking)
---
# Segue Editor Window
The segue editor is used to change how tracks are positioned in the project. The segue editor only allows editing of positions of three tracks at a time. Other tracks in the project will not be affected by changes made relative to these tracks. It is possible to move tracks, trim the start and end, and fade tracks in and out or adjust the volume.
The Segue Editor window showing the waveform, recording controls, segue information, audio settings and carts.
### Waveform
The waveform represents the audio signal. It shows the changes in amplitude over the duration of the track. A thick vertical line shown on the track represents a cue point marker. The Cue In point is shown in **green**, the Cue Out point is shown in **pink** and the Intro point is shown in **cyan**. Cue Points can be changed via [Manage > Tracks](/PlayItVoiceTrack/113/en-US/tracks/manage-tracks) and editing a track.
### Waveform top bar
Drag and drop the top bar of the track to align it with the previous or next track.
### Fade envelope
Click the orange line on the waveform to edit the fade envelope. Clicking on the line will create an envelope point. Adding multiple envelope points will allow you to create a shape to adjust the fade volume. To remove a point, drag the point outside the waveform box. A gray line shows the envelope that has been automatically applied because the **Duck other tracks** option has been checked on another parallel track. The appearance of the waveform changes to show the effective volume with the envelope applied.
### Voice track description (Voice track only)
The description entered for the voice track is shown in the text box below the waveforms, so you can see what the link is about while you record it. This is only shown when editing the segue of a voice track that has a description. The description can be set when editing the placeholder duration of the voice track from the playlist.
### Recording and playback controls
- **Record button:** start recording from your microphone. The microphone device can be set up from the [Settings window](/PlayItVoiceTrack/113/en-US/settings/overview). The previous track will begin playing from the end of the track. The amount of audio that you hear at the end of the track is determined from the [Audition Time setting](/PlayItVoiceTrack/113/en-US/settings/overview). This button is disabled if you are not editing the segue for a voice track.
- When recording a voice track the record button will change to the **Play next** button. When this button is clicked the next track will begin playing.
- When the next track is playing the button will change to a **Stop** button. When the stop button is pressed the recording and playback will stop.
- **Tip:** You can use the `R` keyboard key to begin recording, play next and stop.
- **Delete recording button:** deletes the recording so it can be discarded. This button is disabled if you are not editing the segue for a voice track.
- **Play button:** start playback from the current playback position.
- **Pause button:** pause playback at the current playback position.
- **Stop button:** stop playback and reset to the previously selected position marker.
- **Move to start:** move the position marker to the start of the view.
- **Move back a track:** move the position marker to the previous track from the current position.
- **Move forward a track:** move the position marker to the next track from the current position.
- **Move to end:** move the position marker to the end of the view.
- **Current playback position:** indicates how long has elapsed in the project.
### Zoom controls
As an alternative to using the mouse wheel to zoom the multi-track view, you can use the zoom buttons to zoom in and out.
### Previous / Next Segue buttons
Quickly move to the previous or next tracks in the project. These can be used to iterate through each of the tracks in the project efficiently.
### Previous / Next Voice buttons
As above, but you will advance to only voice track segues. These can be used to iterate through each voice track and quickly record voice tracks.
### Segue Information
The segue information shows how the selected track will sequence from the previous track into the next track. To see the segue information for the track simply click on the waveform.
The **segue style** defines specific ways that the track will sequence:
- By default, the segue style is **Cue Out/In**, this means the cue in of the track will line up with the cue out of the previous track.
- For **Sweep Start**, the sweeping track will start at the same time as the next track, provided it is short enough to play before the intro point of the next track. If the sweeping track is longer than the intro of the next track, the sweeping track will start before the next track and play up to the end of the intro.
- For **Sweep Intro**, the sweeping track will finish playing immediately before the end of the intro point of the next track.
- For **Custom**, you can manually set up how the tracks sequence with each other.
When you move a track by dragging the waveform the segue style will automatically change to Custom.
Note that **Sweep Start** and **Sweep Intro** require Intro points to be set on tracks, otherwise **Cue Out/In** will be used.
The **Duck other tracks** checkbox can be used to reduce the volume of the previous and next track when this track is played. You can configure the ducking (volume and speed) via the Settings button. When ducking is active you can see the effective track envelope changing to show the volume change.
### Audio Settings
If the audio is too quiet, apply gain to increase the volume. This is particularly useful if your microphone recording is very quiet. You can set the default Gain for voice tracks in [Settings](/PlayItVoiceTrack/113/en-US/settings/overview).
You can also adjust the tempo of the track here if you need to fit more tracks into your project duration.
### Carts (Voice track only)
Carts can be used to record other audio into your voice track, for example a bed (background music) or a station ident. You can drag and drop audio from the file system into a cart, or use the load icon to load a track from the database. Click the Play button to play the audio while recording your voice track. Use the volume slider to adjust the volume of the audio if you want to talk over it. Please ensure that you have loaded the cart before recording the voice track.
### Settings button
The settings button allows quick access to PlayIt VoiceTrack [settings](/PlayItVoiceTrack/113/en-US/settings/overview) from the segue editor. Here you can edit the audition time or the audio devices for playback or recording.
### Save button
Save your segue changes and close the segue editor window.
### Cancel button
Discard your segue changes and close the segue editor window.
## See also
- [Main Window](/PlayItVoiceTrack/113/en-US/main-window/overview)
- [Your First Voice Tracked Show](/PlayItVoiceTrack/113/en-US/getting-started/your-first-voice-tracked-show)
- [Settings](/PlayItVoiceTrack/113/en-US/settings/overview)
---
# Edit Project Window
Use the Edit Project window to change the project name and target recording duration of the current project. Open it from the [main window](/PlayItVoiceTrack/113/main-window/overview) by clicking the **Edit Project...** button or by selecting **File > Edit Project...** from the menu.
The Edit Project window.
### Project Name
The name of the project for your own reference.
### Target Duration
The target duration of your full project recording. This is typically the length of the final broadcast show.
### OK button
Save your changes and close the Edit Project window.
### Cancel button
Discard your changes and close the Edit Project window.
## See also
- [Main Window](/PlayItVoiceTrack/113/main-window/overview)
---
# Generate Playlist
The Generate Playlist feature builds a playlist automatically based on a template and applies it to your project. This means you do not need to manually select tracks for your show project. To generate a playlist you will need to populate the database with tracks via [Manage > Tracks](/PlayItVoiceTrack/113/tracks/manage-tracks).
Open the window from the [main window](/PlayItVoiceTrack/113/main-window/overview) by selecting **File > Generate Playlist...** from the menu.
The Generate Playlist window before any items have been generated.
### Template
The template used to generate your playlist. Click the **Edit...** link to edit the selected template or the **Delete...** link to delete it. Click **Create New Template...** to create a blank template.
Clicking the Edit or Create New links opens the [Playlist Template Builder](/PlayItVoiceTrack/113/main-window/playlist-template-builder).
On first run, an example template is provided as a starting point.
### Rules
A simple rule is provided to ensure the same artist is not played too close to another song by the same artist. A 'song' is a track with a Type field of 'Song'.
### Generate button
Click **Generate** to generate a playlist from the selected template. A progress bar is shown while the generation takes place.
### Use Playlist button
If you are happy with the generated items, click **Use Playlist**. If your project already has items you will be prompted to replace the existing items or add the generated items to the end.
### Close button
Close the window without adding any items to your project.
## Generated items
After the generation has finished, the list is populated with the generated items.
The Generate Playlist window after clicking Generate.
### Generated Items
The list of items generated from the template, in the order they will appear in the playlist. Each row shows the start time, item description and duration.
## See also
- [Playlist Template Builder](/PlayItVoiceTrack/113/main-window/playlist-template-builder)
- [Main Window](/PlayItVoiceTrack/113/main-window/overview)
---
# Playlist Template Builder
As the name suggests, the Playlist Template Builder is used to build playlist templates. A template is comprised of multiple sections in order. A section can either be a static set of items, or a set of items that fills for a period of time. A section that fills will try its best to fit the items to the time specified.
For each item, PlayIt VoiceTrack will select a track that corresponds to the type of the item. It can select a track by track type (e.g. Song), a track group (as defined in [Manage > Track Groups](/PlayItVoiceTrack/113/en-US/track-groups/choose-type)), or a specific track (as defined in [Manage > Tracks](/PlayItVoiceTrack/113/en-US/tracks/manage-tracks)). You can also select Voice Track and specify a time to insert a voice track placeholder for later recording.
Open the Playlist Template Builder by clicking **Edit** or **Create New Template** in the [Generate Playlist](/PlayItVoiceTrack/113/en-US/main-window/generate-playlist) window.
The Playlist Template Builder window editing a template.
### Template Name
The name of the template, as displayed in the Template dropdown in the [Generate Playlist](/PlayItVoiceTrack/113/en-US/main-window/generate-playlist) window.
### Template Section
A template section specifies a list of items to generate. Click the cog icon to edit the section in the [Edit Section](#editing-a-section) window. Here you can change the name of the section, or turn it into a 'Fill' section. If enabled, the items in the section will be repeated until the specified duration is filled. PlayIt VoiceTrack will try its best to fit the section to the selected duration.
Click the cross icon to delete the section.
### Template Item
An item in a section of the template. Possible types of item are:
- **Track Group:** Select a track group as defined in [Manage > Track Groups](/PlayItVoiceTrack/113/en-US/track-groups/choose-type). PlayIt VoiceTrack will select a track from that track group and will ensure that all tracks in that track group are selected before ever selecting that track again.
- **Track Type:** Select a track type as defined on the track Type field.
- **Track:** Select a specific track as defined in [Manage > Tracks](/PlayItVoiceTrack/113/en-US/tracks/manage-tracks).
- **Voice Track:** Select a voice track with a specified duration. PlayIt VoiceTrack will generate a voice track placeholder for later recording.
Use the row buttons to clone the selected item, move it up, move it down, or delete it.
### Add Section button
Add another section to the end of the template.
### Save
Save the template.
### Cancel
Discard any changes to the template.
## Editing a section
Click the cog icon on a section to open the Edit Section window. Here you can rename the section, or check the box to turn it into a 'Fill' section and choose how long it should fill for.
The Edit Section window, where a section is renamed or set to fill a duration.
## See also
- [Generate Playlist](/PlayItVoiceTrack/113/en-US/main-window/generate-playlist)
---
# Mixdown Audio Window
To play your project in another audio player you need to mixdown the audio to an audio file. Open the Mixdown Audio window from the [main window](/PlayItVoiceTrack/113/en-US/main-window/overview) by clicking the **Mixdown Audio** button or by selecting **File → Mixdown Audio...** from the menu.
The Mixdown Audio window.
### File
The file name and folder for the audio mixdown. Click the **Browse...** button to navigate to a folder and choose a name interactively.
### Format options
Select the format of the audio mixdown. Choose from MP3 or WAV format. For MP3 you can choose the bit rate and mono/stereo option. Lower bit rates take up less disk space but have a lower audio quality.
### Extend / Trim or fade
Check this box if you want the mixdown file to match the target duration. If your project is short it will be extended to the target duration with silence. If it is too long it will be shortened and faded at the end to the time specified.
### Dynamic range compression settings
Apply dynamic range compression to the mixdown to reduce the difference between the loudest and quietest sounds. Choose a preset from the list or pick **Custom** to set your own threshold, ratio, attack, release and output gain values.
### Save CUE file
A cue file (or cue sheet) is a metadata file that describes how the tracks in the mixdown file are positioned. The file can be used by other playout systems, such as PlayIt Live, to display and report the currently playing song within the larger audio file.
### Open file after mixdown
Once the mixdown process has finished, the audio file will open in your default audio player.
### OK button
Start the mixdown process. A progress window will be shown.
### Cancel button
Close the Mixdown Audio window without starting the mixdown.
## See also
- [Main Window](/PlayItVoiceTrack/113/en-US/main-window/overview)
---
# Settings
The Settings window configures audio devices, default project values, recordings folder, language and other application-wide preferences for PlayIt VoiceTrack.
Open the Settings window from the [main window](/PlayItVoiceTrack/113/main-window/overview) by selecting **File > Settings...** from the menu.
The Settings window is divided into tabs. This page covers the **General** tab, which contains the most commonly used settings. The remaining tabs are documented on their own pages:
- [Segue Settings](/PlayItVoiceTrack/113/settings/segue)
- [Audio Analysis](/PlayItVoiceTrack/113/settings/audio-analysis)
- [Web Links](/PlayItVoiceTrack/113/settings/web-links)
The General tab of the Settings window.
### Section Tabs
The tab strip at the top of the Settings window allows you to switch between the different settings sections.
### Language
Select the display language for PlayIt VoiceTrack. Changes take effect after restarting the application.
### Main Playback device
The playback audio device used when playing audio from the main window.
### Segue Editor Playback device
The playback audio device used when playing audio from the segue editor window.
### Microphone Recording device
The recording device used when recording a voice track from the segue editor window. The device chosen here should not record audio that is played back, to avoid music being captured in the voice track recording.
### Default Project Target Duration
When you create a new project, this is the target duration that is set for the project by default.
### Default Voice Track Duration
When you insert a voice track, this is the initial duration that is set for the placeholder.
### Audition Time
When you start recording, this is the number of seconds from the end of the previous track you will hear.
### Recordings Folder
The location where the voice track recordings are stored on disk. Click **Browse...** to choose a different folder.
### Recordings Format
The audio format of voice track recordings. High bit rates produce higher quality recordings but take up more space on disk.
### Default Gain
When a voice track is recorded use this volume gain by default. This can be used if your microphone level is consistently too quiet without gain.
### OK button
Save the settings and close the Settings window.
### Cancel button
Discard the changes and close the Settings window.
## See also
- [Segue Settings](/PlayItVoiceTrack/113/settings/segue)
- [Audio Analysis](/PlayItVoiceTrack/113/settings/audio-analysis)
- [Web Links](/PlayItVoiceTrack/113/settings/web-links)
---
# Segue Settings
The **Segue Settings** tab of the [Settings](/PlayItVoiceTrack/113/settings/overview) window configures the default sweeper segue style and how PlayIt VoiceTrack ducks other players when sweepers or voice tracks are inserted into the playlist.
The Segue Settings tab of the Settings window.
### Default sweeper segue style
The sweeper segue style to use by default when a sweeper is added to the playlist.
### Sweeper volume ducking
When a sweeper is added to the playlist, you can automatically reduce (duck) the volume of other players playing at the same time. You can manually choose to duck the volume of other players via the [segue editor](/PlayItVoiceTrack/113/main-window/segue-editor).
### Voice track volume ducking
When a voice track is added to the playlist, you can automatically reduce (duck) the volume of other players playing at the same time. You can manually choose to duck the volume of other players via the [segue editor](/PlayItVoiceTrack/113/main-window/segue-editor).
## See also
- [Settings overview](/PlayItVoiceTrack/113/settings/overview)
- [Segue Editor](/PlayItVoiceTrack/113/main-window/segue-editor)
---
# Audio Analysis Settings
The **Audio Analysis** tab of the [Settings](/PlayItVoiceTrack/113/en-US/settings/overview) window configures the cue in and cue out thresholds used when PlayIt VoiceTrack analyzes tracks and voice tracks for silence. These thresholds determine the volume level below which audio is considered silent.
The Audio Analysis tab of the Settings window.
### Track Silence Analysis
When a track is added to PlayIt VoiceTrack it will be analyzed for cue in and cue out points. Set the cue in and cue out thresholds (in dB) here to an appropriate level of silence which will help segues work more accurately.
### Voice Track Silence Analysis
When a voice track is recorded its volume is analyzed for cue in and cue out points. Set the cue in and cue out thresholds (in dB) here to an appropriate level of silence which will help ducking and segues work more accurately.
## See also
- [Settings overview](/PlayItVoiceTrack/113/en-US/settings/overview)
- [Segue Editor](/PlayItVoiceTrack/113/en-US/main-window/segue-editor)
---
# Web Links Settings
The **Web Links** tab of the [Settings](/PlayItVoiceTrack/113/settings/overview) window configures custom web links that appear on the right-click context menu of tracks. Web Links can be used to quickly search the web for an artist or track by right-clicking a track in the track list or in the [segue editor](/PlayItVoiceTrack/113/main-window/segue-editor).
The Web Links tab of the Settings window.
### Web Links list
The list of configured web links:
- **Display Text** - The text displayed on the right-click context menu, e.g. `Wikipedia: {artist}` would display `Wikipedia: ABBA`. The `{artist}` placeholder can be used here so the menu entry reflects the current track.
- **URL** - The URL (web address) opened in the browser. Placeholders for `{artist}`, `{title}` and `{album}` can be used and are automatically replaced with the current track's artist, title and album.
- **Order** - The order in which the links appear on the context menu. This can be changed using the Up/Down buttons.
### Actions
Use the buttons to manage your web links:
- **Add...** - Add a new web link.
- **Edit...** - Edit the selected web link.
- **Up** / **Down** - Reorder the selected link.
- **Reset to defaults...** - Clear all existing web links and start again with the defaults.
## Examples
Display Text
URL
Comments
Wikipedia: {artist}
`https://www.duckduckgo.com/?q=\{artist} band site:wikipedia.org`
Uses DuckDuckGo to find the first result matching the search. The backslash `\` denotes this.
Wikipedia: {artist} - {title}
`https://www.duckduckgo.com/?q=\{artist} - {title} song site:wikipedia.org`
Uses DuckDuckGo to find the first result matching the search. The backslash `\` denotes this.
Google: {artist} - {title}
`https://www.google.com/search?q={artist} - {title}`
Wikipedia: {artist}
`https://en.wikipedia.org/w/index.php?search={artist}`
Directly search Wikipedia.
All Music: {artist}
`https://www.allmusic.com/search/all/{artist}`
Discogs: {artist} - {title}
`https://www.discogs.com/search/?q={artist} - {title}&type=release`
MusicBrainz: {artist}
`https://musicbrainz.org/search?type=artist&query={artist}`
## See also
- [Settings overview](/PlayItVoiceTrack/113/settings/overview)
---
# Administration
Administration covers the day-to-day setup tasks for PlayIt VoiceTrack: choosing where your tracks come from, managing the contents of your track library, and viewing your license information.
## In this section
- [Select Data Source Window](/PlayItVoiceTrack/113/en-US/administration/select-data-source): Choose whether PlayIt VoiceTrack uses its own database or reads tracks from an existing PlayIt Live installation.
- [Tracks](/PlayItVoiceTrack/113/en-US/tracks/overview): Browse, search, edit and import tracks into your library.
- [Track Groups](/PlayItVoiceTrack/113/en-US/track-groups/overview): Organize tracks into groups for use in playlist templates.
- [License Information](/PlayItVoiceTrack/113/en-US/licence/information): View license information and activate optional premium modules.
---
# Select Data Source Window
PlayIt VoiceTrack has its own database for storing track and track group data. If you are also a user of PlayIt Live, you can use PlayIt Live's database instead. Tracks and track groups read from PlayIt Live are read-only and cannot be edited from within PlayIt VoiceTrack, but they can be viewed and used in your voice-tracked projects.
Open the Select Data Source window from the [main window](/PlayItVoiceTrack/113/main-window/overview) by selecting **File > Select Data Source...** from the menu.
The Select Data Source window.
### PlayIt VoiceTrack database
Select this option to use the PlayIt VoiceTrack database for managing track and track group data. Tracks can be managed from the [Manage Tracks](/PlayItVoiceTrack/113/tracks/manage-tracks) window and track groups can be managed from the [Manage Track Groups](/PlayItVoiceTrack/113/track-groups/manage-track-groups) window.
### PlayIt Live database
Select this option to use your PlayIt Live database as the source of tracks and track groups. You can view tracks and track groups from the [Manage Tracks](/PlayItVoiceTrack/113/tracks/manage-tracks) and [Manage Track Groups](/PlayItVoiceTrack/113/track-groups/manage-track-groups) windows, but they cannot be edited from within PlayIt VoiceTrack. They must be managed from PlayIt Live. This option is only available when PlayIt Live is installed on the same computer.
### OK Button
Save your changes and close the window.
### Cancel Button
Discard your changes and close the window.
---
# Tracks
Tracks represent audio files that can be imported into PlayIt VoiceTrack. With each track, additional information is stored to assist playback and the host:
- **Type:** The type of the track, which can be used for track group filtering, e.g. Song or Station ID. Type can be selected when creating a [playlist template](/PlayItVoiceTrack/113/main-window/playlist-template-builder). By default this is set to **Inferred**, which means the type is determined automatically from the tags, artist, title and duration. See [Inferred Type rules](#inferred-type-rules) below.
- **Artist:** The performer of the track, typically a singer or band.
- **Title:** The name of the track.
- **Out Cue:** The style at which the track ends, for example fade out or sustain.
- **Album:** The album the track appears on.
- **Genre:** The category that identifies the type of music.
- **Year:** The year the track was released.
- **Tags:** A tag is a keyword or term that helps to describe the track. Tags can be used in track group filters.
- **Comments:** A free-text field for any descriptive text about a track. This can be useful for noting where and when the track charted, or for presenter cues.
- **Sweeper?** Whether the track is a sweeper. A sweeper is a track that can be played over the start of the intro of another song. It is typically dry (no background music) so it does not clash with the track it is playing over.
- **Adjust Tempo:** Makes the track faster or slower by up to 10%. The pitch of the track is preserved.
- **Gain:** Makes the track louder or quieter. The value can be set automatically using the [Loudness Analysis](/PlayItVoiceTrack/113/loudness-analysis) feature.
- **Cue In:** The position in the track where a player should start playing. This is typically where the silence ends at the start of the track and the audible audio begins.
- **Intro:** The position in the track where the vocals begin. This can be used by the on-air presenter to "hit the vocals".
- **Cue Out:** The position in the track where it is considered to be finished. If a track is fading out, this should be shortly before the end of the fade.
## Inferred Type rules
When a track's type is set to **Inferred**, PlayIt VoiceTrack determines the type automatically using the following rules, in order:
1. If any of the track's tags match a track type name, that type is used.
2. Otherwise, if the artist or title field matches a track type name, that type is used.
3. Otherwise, if the duration is less than 30 seconds, **Station ID** is inferred.
4. Otherwise, **Song** is inferred.
All comparisons are case-insensitive.
## In this section
- [Manage Tracks Window](/PlayItVoiceTrack/113/tracks/manage-tracks): Browse, search and manage your track library.
- [Edit Track Window](/PlayItVoiceTrack/113/tracks/edit-track): View and edit the properties of a track.
- [Add New Tracks Wizard](/PlayItVoiceTrack/113/tracks/add-new-tracks-wizard): Import new tracks into your library from files or folders.
---
# Manage Tracks Window
The Manage Tracks window shows all tracks imported into PlayIt VoiceTrack. Tracks imported into PlayIt VoiceTrack can be used from the Track List on the right-hand side of the [main window](/PlayItVoiceTrack/113/main-window/overview).
Open the Manage Tracks window from the **Manage** menu by clicking **Tracks...**.
The Manage Tracks window showing the track library.
### Track Group Selector
Use the Track Group dropdown to filter the track list by a specific track group. The track list will show only tracks that exist in the selected group. Track groups can be managed from [Manage > Track Groups](/PlayItVoiceTrack/113/track-groups/manage-track-groups).
### Export to CSV
Click this button to export the current track list to a CSV file. Any active search filter or track group filter is included in the export. This is useful for creating reports or sharing track information with external systems.
### Track Search Box
Use the search box to filter the track list. When text is entered, the list will show only tracks whose artist, title or other properties contain the entered text. Click the **×** in the search box to clear the search.
### Track List
The track list shows the Artist, Title, Intro, Duration and Path of all the tracks in the database. Double-click a track to open the [Edit Track](/PlayItVoiceTrack/113/tracks/edit-track) window for that track. Changes are not saved until you click **Apply** or **OK**.
To delete a track, click the delete icon shown on the row. To delete several tracks at once, select them with **Ctrl+A** (or hold **Ctrl** / **Shift** while clicking) and press **Delete**. A confirmation prompt will appear before any tracks are removed.
The delete icon is hidden when PlayIt Live is selected as the data source on the [Select Data Source](/PlayItVoiceTrack/113/administration/select-data-source) window, because tracks managed by PlayIt Live cannot be edited from within PlayIt VoiceTrack.
### Add New Button
Click **Add New** to open the [Add New Tracks Wizard](/PlayItVoiceTrack/113/tracks/add-new-tracks-wizard), which guides you through importing new tracks into your library from files or folders.
### Edit Button
Click **Edit** to open the [Edit Track](/PlayItVoiceTrack/113/tracks/edit-track) window for the selected track. You can also select multiple tracks using **Ctrl** or **Shift** and click **Edit** to bulk-edit their properties.
### OK Button
Save any pending changes and close the Manage Tracks window.
### Cancel Button
Discard any pending changes and close the Manage Tracks window.
### Apply Button
Save any pending changes without closing the Manage Tracks window.
---
# Edit Track Window
The Edit Track window is used to change the information stored on each track imported into PlayIt VoiceTrack. Open it by selecting a track in the [Manage Tracks](/PlayItVoiceTrack/113/en-US/tracks/manage-tracks) window and clicking **Edit**, or by double-clicking a track.
The Edit Track window showing track properties and cue points.
### File Path
The location of the audio file on the file system. This cannot be changed once the track has been added.
### Type
The track type, which can be Song, Station ID, Promo, Commercial, News, Bed or Station ID + Bed. When set to **\-- Inferred --**, the type is determined automatically from the track's tags, artist, title and duration. See [Inferred Type rules](/PlayItVoiceTrack/113/en-US/tracks/overview#inferred-type-rules) for details.
### Artist
The performer of the track. Artist information will auto-complete if similar information exists on other tracks, helping to keep your data consistent.
### Title
The title of the track.
### Out Cue
The last spoken words of the track, used by presenters to talk over the ending.
### Album
The album the track appears on.
### Genre
The genre of the track. Genre information will auto-complete from existing tracks.
### Year
The release year of the track as a four-digit year.
### Tags
Semicolon-separated tags for categorizing the track. Tags can be used in [track group](/PlayItVoiceTrack/113/en-US/track-groups/overview) filters and to influence [Inferred Type rules](/PlayItVoiceTrack/113/en-US/tracks/overview#inferred-type-rules). Tag information will auto-complete from existing tracks.
### Comments
Free-text notes about the track, such as where and when it charted, or usage instructions for presenters.
### Sweeper?
When enabled, marks the track as a sweeper. A sweeper is a track that can be played over the start of the intro of another song. It is typically dry (no background music) so it does not clash with the track it is playing over.
### Adjust Tempo
Makes the track faster or slower by up to 10%. The pitch of the track is preserved.
### Gain
Adjusts the playback volume of the track in decibels. The value can be set automatically using the [Loudness Analysis](/PlayItVoiceTrack/113/en-US/loudness-analysis) feature.
### Track ID
A unique identifier for the track, used for integration with external systems such as music scheduling software or playout logging.
### Cue Point Controls
The cue point controls let you set the following points for the track:
- **Cue In**: The position in seconds where a player should start playing. This is typically where the silence ends at the start of the track and the audible audio begins.
- **Intro**: The position in seconds where the vocals start on the track. This is counted down by the players on the main window.
- **Hook Start** / **Hook End**: Define the start and end of a hook, a short highlight segment of the song. Click the **Hooks** section to expand these cue points. Hooks can be set here, but they are only used by PlayIt Live's hook sequences and are currently ignored by PlayIt VoiceTrack.
- **Early Out**: The position where the track is considered to be almost finished. Click the **E. Out** section to expand this cue point. Early Out can be used in two scenarios:
- For songs, the point marks where a sweeper can be placed as the track is finishing, providing a smoother transition.
- For tracks marked as **Sweeper**, the point marks where the next track can start, allowing the end of the sweeper to play over the intro of the next song.
- **Cue Out**: The position in seconds where the track is considered to have finished.
Each cue point has its own **Set**, **Test** and **×** buttons:
- **Set**: While listening to the track, click **Set** to capture the current playback position as the cue point value.
- **Test**: Click **Test** to play the track from the cue point position.
- **×**: Click to reset the cue point to its default position.
Cue points can also be adjusted using the keyboard or mouse. Click on the cue point value of interest, then use the following:
Action
Result
**Left Arrow** / **Right Arrow**
Adjust the cue point by 0.01 seconds.
**Shift+Left Arrow** / **Shift+Right Arrow**
Adjust the cue point by 0.1 seconds.
Click and drag over the cue point value
Adjust the cue point with the mouse.
**Enter** or double-click the cue point value
Test playback from the cue point.
**Spacebar**
Stop playback.
### Analyze Button
Click **Analyze** to automatically detect the **Cue In** and **Cue Out** points based on the silence at the start and end of the track. The sensitivity of the analysis can be configured from [Settings > Audio Analysis](/PlayItVoiceTrack/113/en-US/settings/audio-analysis).
### Waveform
The waveform shows the volume of the audio track over time. Cue point markers are overlaid on the waveform:
Cue point
Color
Cue In
Gray
Intro
Blue
Hook
Hot pink
Early Out
Orange
Cue Out
Red
Double-click on the waveform to start playing at a different position in the track. Use the **Play** and **Stop** buttons to control playback, and the **Go to start** and **Go to end** buttons to jump to the start or end of the track. Use the **Zoom** buttons to zoom in and out of the waveform if you need to set a more precise cue point. You can also zoom with the mouse wheel while hovering over the waveform.
### Track Navigator
Use the **<** and **\>** buttons to navigate between the previous and next tracks in the Manage Tracks list without closing the window. Any changes to the current track are saved automatically before moving to the next one. The current position and total track count are shown alongside.
### Save Track Button
Click **Save Track** to confirm changes to the current track and close the window.
### Close Button
Click **Close** to discard any unsaved changes and close the window.
---
# Add New Tracks Wizard Window
The Add New Tracks Wizard is designed to streamline the process of adding tracks to PlayIt VoiceTrack. To open it, go to **Manage > Tracks...** and click the **Add New** button in the [Manage Tracks](/PlayItVoiceTrack/113/en-US/tracks/manage-tracks) window.
The first page of the wizard asks you to choose how you would like to add tracks.
The Add New Tracks Wizard showing the source selection options.
### From Individual File(s)
Select this option to add one or more specific audio files. When you click **Next**, you will be prompted to browse and select the files you wish to add.
### From a Folder
Select this option to add all supported audio files from a folder. When you click **Next**, you will be prompted to choose a folder. All audio files found in the folder (and optionally its sub-folders) will be imported.
### From a CSV import file
Select this option to import track data from a CSV file. When you click **Next**, you will be prompted to select a CSV file containing track metadata and file paths. See [CSV Track Import](/PlayItVoiceTrack/113/en-US/tracks/csv-track-import) for details on how to create a CSV file and the full list of supported columns.
To generate a template CSV file, go to **Manage > Tracks** and export the current list of tracks using the **Export track list to CSV** button. You can then modify the exported file to import a new set of tracks.
The columns read by the CSV track importer are:
- Artist
- Title
- Album
- Path
- Duration (seconds)
- Intro
- Cue In
- Cue Out
- Genre
- Year
- Out Cue
- Tags
- Comments
- ISRC
- Record Label
- Type
- Disabled
- Expires
- Valid From
- No Fade
- Sweeper
### Back Button
The **Back** button is enabled once you are beyond the first step of the wizard. Click it to make changes in earlier steps.
### Next Button
Click the **Next** button to move to the next step in the wizard.
### Cancel Button
Click the **Cancel** button to exit the wizard without adding any tracks.
## In this section
- [Additional Options Section](/PlayItVoiceTrack/113/en-US/tracks/add-new-tracks-additional-options): Configure sub-folder scanning, silence analysis and duplicate handling for the import.
- [Progress Section](/PlayItVoiceTrack/113/en-US/tracks/add-new-tracks-progress): Watch the progress as tracks are loaded and analyzed.
- [Review Section](/PlayItVoiceTrack/113/en-US/tracks/add-new-tracks-review): Check, edit and select which tracks to import.
- [Group Section](/PlayItVoiceTrack/113/en-US/tracks/add-new-tracks-group): Assign the imported tracks to a track group.
---
# CSV Track Import
PlayIt VoiceTrack can import tracks from a CSV (Comma-Separated Values) file using the [Add New Tracks Wizard](/PlayItVoiceTrack/113/en-US/tracks/add-new-tracks-wizard). This is useful when migrating track metadata from another playout system, a music scheduling tool, or a spreadsheet.
## Before You Start
The CSV importer expects data in a specific format. If you are exporting from another system, you will almost certainly need to convert and reformat the data before it can be imported into PlayIt VoiceTrack. This requires some manual effort and familiarity with spreadsheet tools such as Microsoft Excel or Google Sheets.
In particular, all duration and cue point values must be in **decimal seconds**. Formats like `3:45` or `0:08.5` are not accepted because they are ambiguous (they could represent minutes:seconds or hours:minutes). You will need to convert these values yourself before importing. See [Value Formats](#value-formats) below for details.
The best approach is to export a few tracks from PlayIt VoiceTrack first using the CSV export in [Manage Tracks](/PlayItVoiceTrack/113/en-US/tracks/manage-tracks). This gives you a template showing the exact column names and value formats that the importer expects.
## Creating a CSV File
The CSV file must have a header row with column names, followed by one row per track. You can create the file in any spreadsheet application and export it as CSV, or write it in a text editor.
### Minimal Example
At minimum, each track needs a file path and a duration:
```
Path,Artist,Title,Duration
C:\Music\Katrina and the Waves - Walking on Sunshine.mp3,Katrina and the Waves,Walking on Sunshine,239
C:\Music\Journey - Don't Stop Believin'.mp3,Journey,Don't Stop Believin',250.5
C:\Music\Queen - Bohemian Rhapsody.mp3,Queen,Bohemian Rhapsody,354
```
### Full Example
A more complete CSV file with timing and metadata columns:
```
Path,Artist,Title,Duration,Intro,Cue In,Cue Out,Genre,Year,Type
C:\Music\Walking on Sunshine.mp3,Katrina and the Waves,Walking on Sunshine,239,8.5,0,228,Pop,1985,Song
C:\Music\Bohemian Rhapsody.mp3,Queen,Bohemian Rhapsody,354,15,0,340,Rock,1975,Song
```
## Value Formats
Every column has a specific value format. Using the wrong format will cause the row to be skipped during import.
### Decimal Seconds
All duration and cue point columns must be in **decimal seconds** using a dot (`.`) as the decimal separator.
Correct
Incorrect
`239`
`3:59`
`8.5`
`0:08.5`
`228.75`
`3:48.75`
`0`
`0:00`
If your source data uses `minutes:seconds` format, you will need to convert it. In a spreadsheet, you can use a formula such as `=MINUTE(A1)*60+SECOND(A1)` to convert a time value in cell A1 to total seconds.
### Text
Text values (Artist, Title, Album, etc.) are plain strings. If a value contains a comma, the entire value must be enclosed in double quotes in the CSV file. Most spreadsheet applications handle this automatically when exporting to CSV.
### Boolean
Boolean columns (No Fade, Sweeper, Disabled, Gain Set Manually?) accept `true` or `false` (case-insensitive). If the column is missing or empty, the value defaults to `false`.
### Date
Date columns (Valid From, Expires) accept standard date formats such as `2026-01-15`. The time portion is ignored.
### Decimal
Decimal columns (Gain DB, Loudness Target LUFS, Tempo Adjust Percentage) use a dot (`.`) as the decimal separator. For example, `-3.5` for a gain reduction of 3.5 dB.
## Column Reference
### Required Columns
Only the **Path** and **Duration** columns are needed for a valid import. All other columns are optional. If a column is missing from the header, the field is left empty or set to its default value.
Column
Format
Description
**Path**
Text
The full file path to the audio file on disk. Used for playback and duplicate detection.
**Duration** or **Duration (seconds)**
Decimal seconds
The total duration of the track (e.g. `239` or `228.5`).
### Track Information
Column
Format
Description
Artist
Text
The artist or performer name.
Title
Text
The track title.
Album
Text
The album name.
Genre
Text
The genre (e.g. Pop, Rock, Jazz).
Year
Text
The release year.
Type
Text
The track type. Must be one of the type identifiers listed below, or left empty.
Tags
Text
Semicolon-separated tags (e.g. `upbeat;classic;80s`).
Comments
Text
Free-text comments about the track.
Out Cue
Text
The out cue text (e.g. "and don't it feel good!").
ISRC
Text
The International Standard Recording Code.
Record Label
Text
The record label name.
Track ID
Text
A custom track identifier.
#### Track Type Values
The Type column must use one of the following values exactly as shown below.
Value
Description
`Song`
A music track.
`Station ID`
A station identification jingle.
`Promo`
A promotional announcement.
`Commercial`
A commercial or advert.
`News`
A news bulletin or clip.
`Bed`
A background music bed.
`Station ID + Bed`
A combined station ID with a background bed.
If the Type column is left empty, the type will be inferred automatically.
### Cue Points and Timing
Column
Format
Default
Description
Intro
Decimal seconds
0
The intro duration. The point at which vocals or the main content begins.
Cue In
Decimal seconds
0
The cue in point. Playback starts from this point.
Cue Out
Decimal seconds
Same as Duration
The cue out point. The track is considered to have finished at this point.
Early Out
Decimal seconds
Not set
The early out point. Marks where the track is almost finished.
Hook Start
Decimal seconds
Not set
The start of the track's hook section. Hooks are only used by PlayIt Live and are ignored by PlayIt VoiceTrack.
Hook End
Decimal seconds
Not set
The end of the track's hook section. Hooks are only used by PlayIt Live and are ignored by PlayIt VoiceTrack.
### Playback Control
Column
Format
Default
Description
No Fade
Boolean
false
Set to `true` to disable the fade-out at the end of the track.
Sweeper
Boolean
false
Set to `true` to mark the track as a sweeper or jingle.
Disabled
Boolean
false
Set to `true` to disable the track from being scheduled or played.
Valid From
Date
Not set
The date from which the track becomes available (e.g. `2026-01-15`).
Expires
Date
Not set
The date after which the track is no longer available.
### Audio Processing
Column
Format
Default
Description
Gain DB
Decimal
Not set
Audio gain adjustment in decibels (e.g. `-3.5`).
Gain Set Manually?
Boolean
false
Set to `true` if the gain value was manually configured rather than auto-detected.
Loudness Target LUFS
Decimal
Not set
The loudness normalization target in LUFS.
Tempo Adjust Percentage
Decimal
Not set
Percentage adjustment to the playback tempo.
## Error Handling
- If a row contains a malformed value (e.g. text in a numeric column), that row is skipped and the error is logged. The rest of the import continues.
- Columns can appear in any order in the CSV file.
- Extra columns not recognized by PlayIt VoiceTrack are ignored.
- If a value contains a comma, enclose it in double quotes (e.g. `"Earth, Wind & Fire"`).
---
# Additional Options Section
After selecting your source on the first page of the [Add New Tracks Wizard](/PlayItVoiceTrack/113/en-US/tracks/add-new-tracks-wizard), the Additional Options page lets you configure how the import will be processed.
The Add New Tracks Wizard showing the additional options for a folder import.
### Source Selection
Displays a summary of the source you selected on the previous page. For a folder import, this shows the folder path. For individual files, it shows the number of files selected.
### Include sub folders
When importing from a folder, check this option to also scan all sub-folders within the selected folder for audio files. This option is only available when importing from a folder.
### Analyze Silence
When checked, PlayIt VoiceTrack will analyze the silence at the start and end of each track and automatically set appropriate Cue In and Cue Out points. This is recommended for most imports. The parameters for the silence analysis can be configured from [Settings > Audio Analysis](/PlayItVoiceTrack/113/en-US/settings/audio-analysis).
### Duplicate handling
Controls what happens when an imported track has the same file path as an existing track in your library. This section is only available when your library already contains tracks.
- **Replace any tracks with the same file path:** If a file is found that has the same path as a track in the system, it will be overwritten by the new track file.
- **Skip any tracks with the same file path:** If a file is found that has the same path as a track in the system, it will be ignored and will not change the existing track already added to PlayIt VoiceTrack.
- **Duplicate any tracks with the same file path:** If a file is found that has the same path as a track in the system, it will be added again, resulting in two instances of the same track in the system.
---
# Progress Section
After configuring your [additional options](/PlayItVoiceTrack/113/en-US/tracks/add-new-tracks-additional-options), the wizard begins importing your tracks. The Progress section shows the status of each file as it is loaded and processed.
The Add New Tracks Wizard showing an import in progress.
### Current Track File Path
Displays the file path of the track currently being processed. This updates as each file is processed.
### Artist and Title
Shows the artist and title of the track currently being processed, as read from the embedded tag information within the file. If this information is missing, the artist and title are determined from the filename in the format `Artist - Title.ext` where `ext` is the file extension.
### Overall Progress
A progress bar showing the overall completion of the import, along with text indicating how many tracks have been processed out of the total. If any files were ignored because they are not valid audio files, the count of ignored files is also displayed.
---
# Review Section
After the [import progress](/PlayItVoiceTrack/113/tracks/add-new-tracks-progress) completes, the wizard moves to the Review section. Here you can choose which tracks to include in the import and review or edit each track's metadata before it is saved to your library.
The Add New Tracks Wizard review page with a track selected for editing.
### Track List
Displays all the tracks discovered during the import, listed alphabetically by artist and title. Each track has a checkbox that controls whether it will be included when you complete the wizard. Click a track to select it and view its details in the track editor panel.
### Track Checkbox
Each track in the list has a checkbox. Uncheck a track to exclude it from the import. Only checked tracks will be added to your library when you complete the wizard. This is useful if some of the discovered files are not tracks you want in your library.
### Track Editor
When you select a track from the list, the track editor panel appears on the right side. This shows the track's metadata as read from the file's tags, including artist, title, album, genre, year, cue points and the waveform. You can edit any of these values before the track is imported. See [Edit Track Window](/PlayItVoiceTrack/113/tracks/edit-track) for full details on the editor and its cue point controls.
---
# Group Section
After [reviewing your tracks](/PlayItVoiceTrack/113/tracks/add-new-tracks-review), the final section of the wizard is the Group section. Here you can add the imported tracks to an existing track group, create a new group for them, or leave them in the All Tracks group. Click **Finish** to add the tracks to your library.
The Add New Tracks Wizard group assignment options.
### Leave in All Tracks Group
Select this option to leave the imported tracks without assigning them to a particular track group. The tracks will still appear in the All Tracks group.
### Add to Existing Group
Select this option to add the imported tracks to an existing track group. Choose the group from the dropdown list.
### Add to New Group
Select this option to add the imported tracks to a new track group. Enter the name of the new group in the text box.
### Finish Button
Click the **Finish** button to complete the wizard and add the tracks to your library.
---
# Track Groups
As the name suggests, Track Groups are used to group tracks by certain criteria. There are three types of track group:
- **Listed**: Manually select a list of tracks to add to the group.
- **Filtered**: Select a set of filters to dynamically select tracks based on information stored on the track.
- **Grouped**: Combine multiple track groups into one track group.
Track groups are used on the main interface to filter tracks in the track list. They are also referenced from [playlist templates](/PlayItVoiceTrack/113/en-US/main-window/playlist-template-builder) to drive how a voice-tracked playlist is built.
When PlayIt VoiceTrack is connected to PlayIt Live as its data source, track groups are read from the connected PlayIt Live system and cannot be created, edited, or deleted from within PlayIt VoiceTrack itself.
---
# Manage Track Groups Window
The Manage Track Groups window lists all the track groups in the system. Open it from the **Manage** menu by clicking **Track Groups...**.
The **Add New** and **Delete** buttons are only available when PlayIt VoiceTrack is using its own local database. When PlayIt VoiceTrack is [connected to PlayIt Live as a data source](/PlayItVoiceTrack/113/administration/select-data-source), track groups are managed in PlayIt Live and these buttons are hidden.
The Manage Track Groups window showing a list of track groups with their types and track counts.
### Search Box
Use the search box to find a track group by name.
### Track Group List
Displays the **Name**, **Type**, **Track Count**, and **Hidden?** state of each track group. Double-click an entry in the list to begin editing. Depending on the type, this will open the [Edit Listed Track Group](/PlayItVoiceTrack/113/track-groups/edit-listed), [Edit Filtered Track Group](/PlayItVoiceTrack/113/track-groups/edit-filtered), or [Edit Grouped Track Group](/PlayItVoiceTrack/113/track-groups/edit-grouped) window.
Each row also includes:
- **Hidden?** checkbox. Tick it to hide the track group from the main interface track group selector.
- **Delete** icon. Click it to delete the track group from the system. This icon is not shown when using PlayIt Live as a data source.
### Move Tracks
Click **Move Tracks...** to open the Move Tracks window, where you can move tracks between two [listed track groups](/PlayItVoiceTrack/113/track-groups/edit-listed).
### Add New
Click **Add New** to begin adding a new track group. This opens the [Choose Track Group Type](/PlayItVoiceTrack/113/track-groups/choose-type) window. This button is not shown when using PlayIt Live as a data source.
### Edit
Click **Edit** to begin editing the selected track group. Depending on the type, this will open the [Edit Listed Track Group](/PlayItVoiceTrack/113/track-groups/edit-listed), [Edit Filtered Track Group](/PlayItVoiceTrack/113/track-groups/edit-filtered), or [Edit Grouped Track Group](/PlayItVoiceTrack/113/track-groups/edit-grouped) window.
### OK
Click **OK** to save changes and close the window.
### Cancel
Click **Cancel** to discard changes and close the window.
---
# Choose Track Group Type Window
When you click **Add New** in the [Manage Track Groups](/PlayItVoiceTrack/113/track-groups/manage-track-groups) window, this dialog appears to let you choose which type of track group to create.
The Choose Track Group Type window with the three track group type options.
### Listed Track Group
Select this option to create a Listed Track Group. Then click **OK** to open the [Edit Listed Track Group](/PlayItVoiceTrack/113/track-groups/edit-listed) window.
### Filtered Track Group
Select this option to create a Filtered Track Group. Then click **OK** to open the [Edit Filtered Track Group](/PlayItVoiceTrack/113/track-groups/edit-filtered) window.
### Grouped Track Group
Select this option to create a Grouped Track Group. Then click **OK** to open the [Edit Grouped Track Group](/PlayItVoiceTrack/113/track-groups/edit-grouped) window.
### OK
Click **OK** to continue creating a track group of the selected type.
### Cancel
Click **Cancel** to stop creating a new track group.
---
# Edit Listed Track Group Window
The Edit Listed Track Group window allows you to manually select which tracks belong to the track group.
The Edit Listed Track Group window showing the track list and track group track list side by side.
### Track Group Name
The name of the track group.
### Track Search Box
Enter text into the search box to filter the track list.
### Track List
List of tracks not already in the track group. You can right-click a track in the track list to show additional options, including the ability to preview the audio to hear what the track sounds like.
### Add to Track Group
Click the **\>** button to add the selected tracks from the track list to the track group.
### Track Group Track List
List of tracks in the track group. You can right-click a track in the track list to show additional options, including the ability to preview the audio.
### Remove from Track Group
Click the **<** button to remove the selected tracks from the track group.
### Color
Check the **Color** box to show a color for any tracks in this track group when they are displayed on the playout log in the main interface. Click in the color box to change the color.
### Icon
Check the **Icon** box to show an icon for any tracks in this track group when they are displayed on the playout log in the main interface. Click in the icon box to change the icon, and the [Select Icon window](#select-icon-window) will be shown.
### Priority
The priority is used to determine which track group is used when displaying a track on the playout log in the main interface that appears in multiple track groups. The track group with the highest priority will be used when displaying the color or icon.
### OK
Click **OK** to confirm changes to the track group.
### Cancel
Click **Cancel** to discard changes to the track group.
## Select Icon window
When you click the icon box, the **Select Icon** window is shown. Choose an icon and click **OK** to assign it to the track group.
The Select Icon window showing the available track group icons.
---
# Edit Filtered Track Group Window
The Edit Filtered Track Group window allows you to create dynamic track groups using filters. For example, you can filter tracks by year to create a "1980s" track group that includes all tracks with a year between 1980 and 1990.
The Edit Filtered Track Group window showing filter conditions and the matching tracks.
### Track Group Name
The name of the track group.
### Filter Builder
The filter builder lets you define one or more conditions that tracks must match to be included in the group.
Each filter row contains:
- **Field Selector** -- choose the track property to filter on, such as Artist, Title, Genre, Year, or Type.
- **Operation Selector** -- choose how the field value is compared, such as Equals, Contains, Starts With, Ends With, or Is Empty.
- **Filter Value** -- enter the value to compare against.
When you have more than one filter row:
- **And / Or Selector** -- choose how to combine the conditions. **And** requires tracks to match both conditions. **Or** requires tracks to match either condition.
- **Open / Close Parentheses** -- use parentheses to group conditions and control the order of evaluation. Use the up and down arrows to add or remove parentheses.
Use the **Add** button to add a new filter condition and the **Remove** button to delete the selected condition.
### Open Parentheses
Use parentheses to form complex filters. Use the up and down arrows to increase and decrease the number of opening parentheses.
### Close Parentheses
Use parentheses to form complex filters. Use the up and down arrows to increase and decrease the number of closing parentheses.
### Add Filter
Click the **Add** button to add a new filter condition. Once you have more than one filter row, a **Remove** button (a minus icon) appears next to each row that you can click to remove that filter condition.
### Color, Icon and Priority
See the [Color, Icon and Priority](/PlayItVoiceTrack/113/en-US/track-groups/edit-listed#colour) settings on the Edit Listed Track Group page.
### OK
Click **OK** to confirm changes to the track group.
### Cancel
Click **Cancel** to discard changes to the track group.
---
# Edit Grouped Track Group Window
The Edit Grouped Track Group window allows you to combine multiple existing track groups into a single track group.
The Edit Grouped Track Group window showing the track group selections.
### Track Group Name
The name of the track group.
### Invert Selection
If this checkbox is checked, the tracks in this group will be the inverse of the selected groups. That is, this track group will include only tracks that do **not** appear in the selected track groups.
### Track Group Selections
Lists all the track groups in the system. Click a checkbox to include the selected track group in this grouped track group.
### Color, Icon and Priority
See the [Color, Icon and Priority](/PlayItVoiceTrack/113/en-US/track-groups/edit-listed#colour) settings on the Edit Listed Track Group page.
### OK
Click **OK** to confirm changes to this track group.
### Cancel
Click **Cancel** to discard changes to this track group.
---
# License Information
The License Information window shows your current license information. Until you activate a license, the **Voice Tracking** module is listed as not licensed, which means PlayIt VoiceTrack runs in demo mode. Use the link to purchase a license. To update your license, click the link and continue as per [these instructions](/PlayItVoiceTrack/113/en-US/getting-started/overview).
The License Information window showing the Voice Tracking module as not licensed, before a license has been activated.
When you have a valid license this will be displayed on this window. If you have recently purchased a license and are logged in, click the **Refresh License** link to fetch the latest license from the server. While you are logged in, the software will periodically check for the latest license to ensure you are up to date.
---
# Loudness Analysis
PlayIt VoiceTrack can analyze your tracks, calculate an offset gain, and store this for each track in your database. When a track is played, this gain will be applied. This ensures each track has the same loudness when played.
The ITU-R BS.1770 algorithm is used to measure loudness. This is commonly known as LUFS normalization.
To begin Loudness Analysis, select a **Target Loudness** (default -16 LUFS) and click **Start Loudness Analysis**.
PlayIt VoiceTrack will run Loudness Analysis in the background as it processes each track. Due to the complexity of the algorithm, it can take several hours to process all the tracks. This only needs to be done once. Leave PlayIt VoiceTrack running so it is able to process the tracks in the background. Any new tracks that are added will be automatically processed in the background.
If your selected Data Source is the PlayIt Live database, Loudness Analysis must be run within PlayIt Live itself.
---
# About PlayIt VoiceTrack
The About window displays the current version of PlayIt VoiceTrack and checks whether a newer version is available. Open it from the [main window](/PlayItVoiceTrack/113/main-window/overview) by going to **Help > About PlayIt VoiceTrack**.
The About window when the software is up to date.
### Current Version
Displays the currently installed version of PlayIt VoiceTrack.
### New Version Check
Indicates whether the installed version is up to date. When a newer version of PlayIt VoiceTrack is available you will be notified here with a link to download the latest version.
### Up time
Shows how long PlayIt VoiceTrack has been running since it was last started.
### OK button
Click the **OK** button to close the window.